Among the #swag I got from my colleagues from their trip to DreamForce 15, there was a pearl:
Amazon Echo, well known as Alexa.
The first (funny) thing I wanted to do was to make it (her) speak italian, and believe me it was as fun as learning how to use the
Alexa Skill Kit: the only language you can use is English of course but you can still make her say strange words that "sound like" italian (after practicing building the library, even you would call it "her").
As usual, if you are a
TL;DR person (btw I'm one of you guys), this is the
GitHub repository with all the Apex Code.
If you know how to setup a Connected App and expose e public webservice, you are ready to go (some changes on the code are still necessary, refer to the README.md file).
When developing an Alexa Skill you have two choices:
In this post I'm not going to show you how Alexa's Request/Response paradigm works, but instead I'll show you how to use the simple Apex library I've developed to
help you implement your own skills and make the provided example service run on your Org.
Why Salesforce?
First of all because the Force.com platform is awesome and you can easily create REST services in few steps.
Secondly because you can integrate Alexa with Salesforce services (read this
awesome post by Jeff Douglas, he has already developed some cool examples in NodeJS playing with Alexa) using your CRM with just voice commands.
So instead of setting up a middleware between Alexa and Salesforce I thought that it would have been amazing to have the service built directly inside Salesforce!
The recipe
This is what we'll be using:
- A new Alexa Skill (defined in the developer portal)
- A Salesforce Alexa Skill Kit implementation (the library)
- A REST webservice (public, to whom Alexa will be speaking)
- A Connected App (to enable OAuth, your service will be using an auth. token)
- A Salesorce Community (custom domain + Branding + Profiles)
- An Amazon Echo (don't you say?!?)
Create a new Alexa Skill
The first thing is to define a new skill.
With your amazon account go to the
Amazon Developer site.
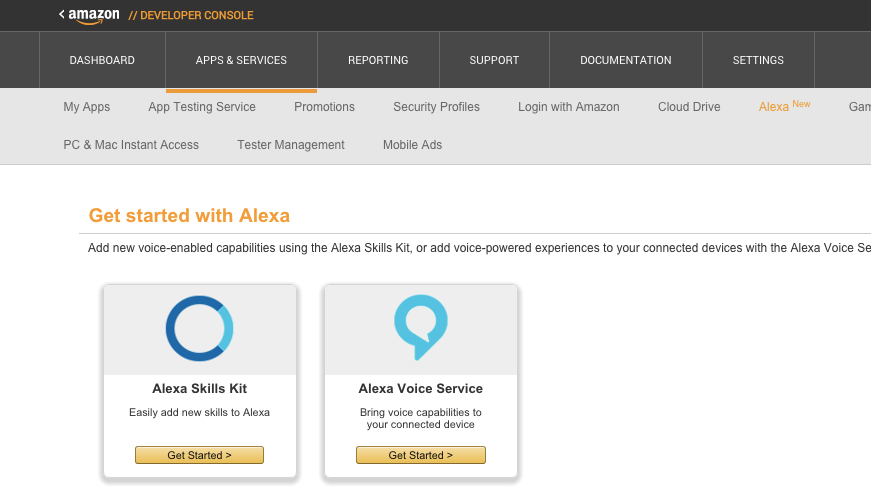
Choose the
Alexa Skill Kit and create a new skill:
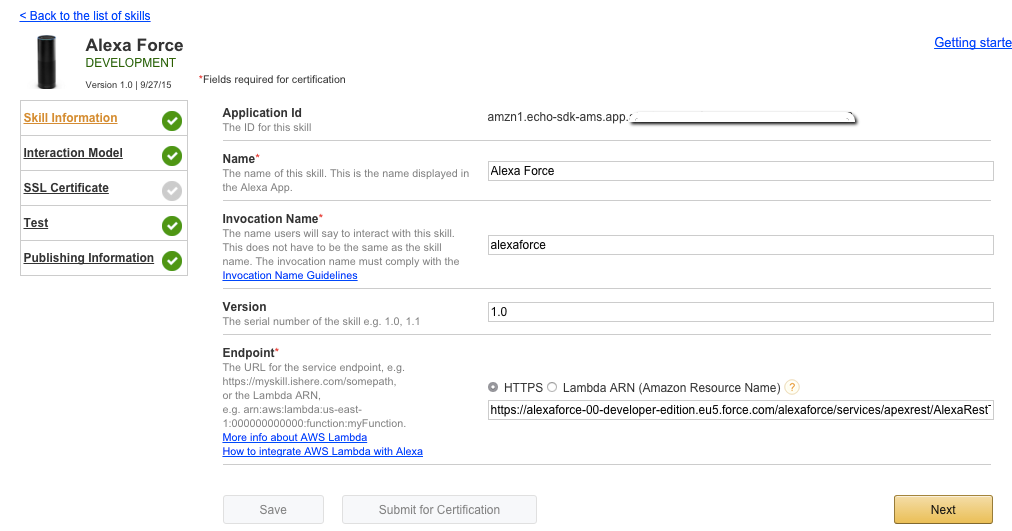
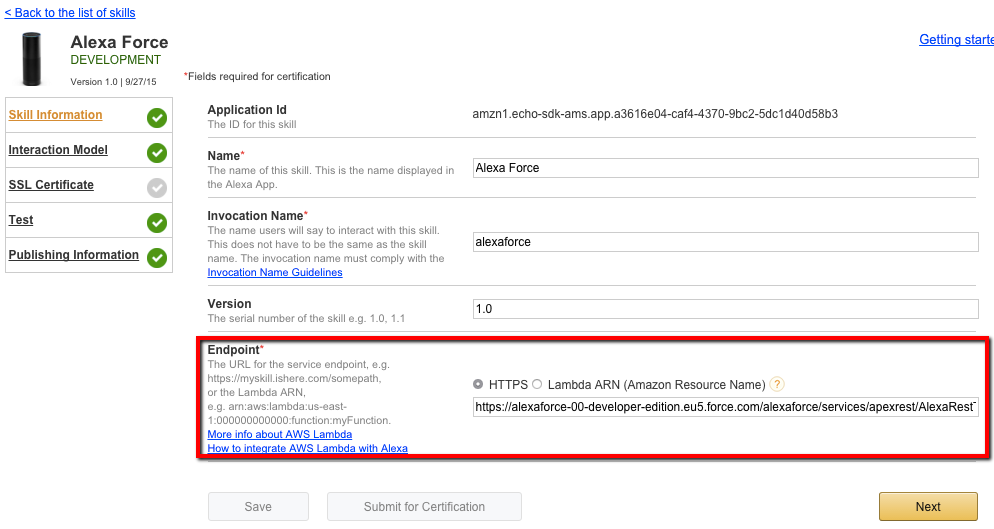
The
Invocation name is the name that you have to say when calling this skill (e.g.
Alexa, ask alexaforce for my user).
The
Endpoint is the URL of the service (it will be your custom Salesforce REST service inside the Community): for now add a fake endpoint, you'll be configuring it later (after configuring the Community and creating the REST service).
Write down your new
Application ID.
By clicking the
Next button you are setting the skill's schema:
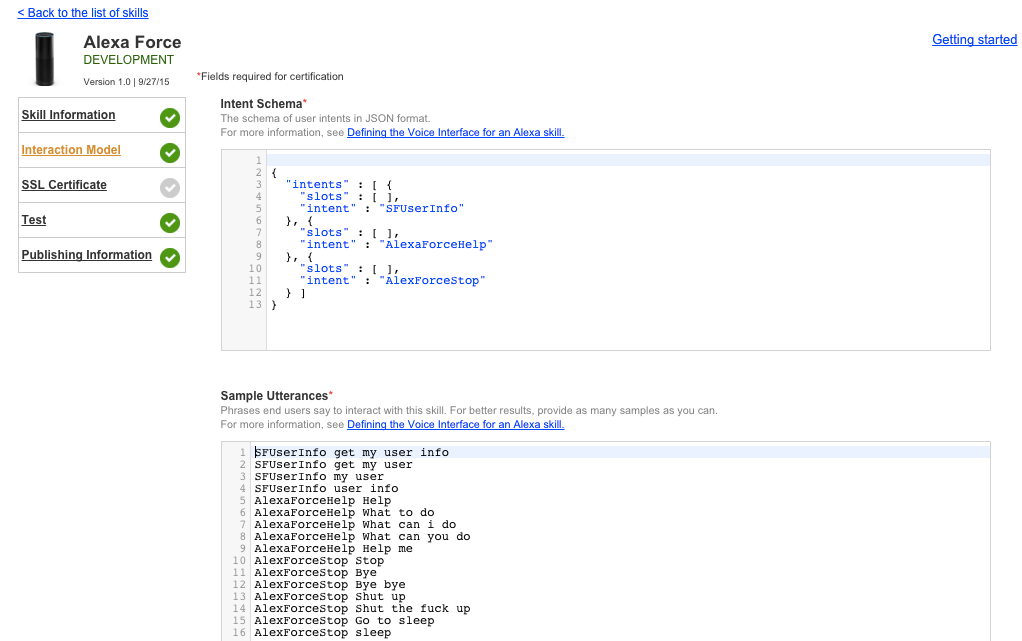
We'll be having 3 simple intents:
- AlexaForceHelp: this helps the user by saying what you can do with this skill
- AlexaForceStop: this is used when you don't want to use the skill anymore (e.g. the AlexaFOrceHelp intent ask for a continuation, by saying "stop" the skill ends)
- SFUserInfo: Alexa reads the full name of the current user (if he is logged)
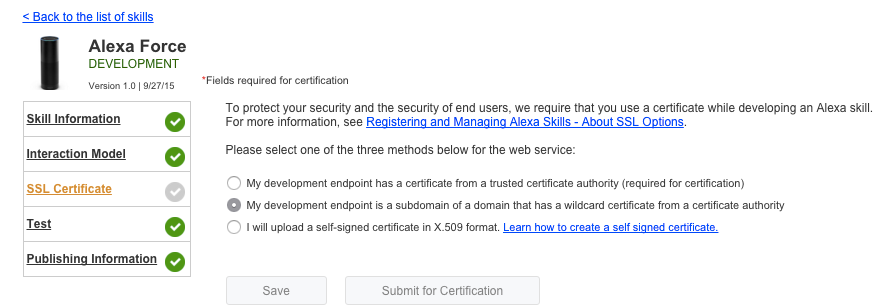
The next configuration step sets up the SSL certificate option (this is all handled by Salesforce platform):
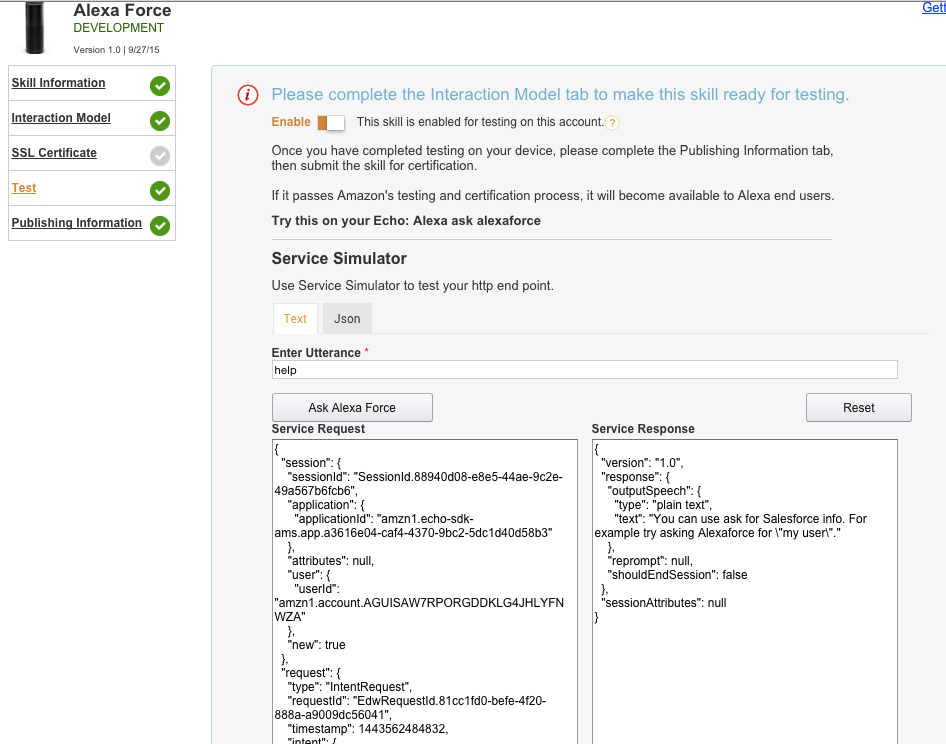
Click "Next" again and the
Test step allow to do some tests with your service (no service is defined for now, so leave this step for now):
The last step is about branding:
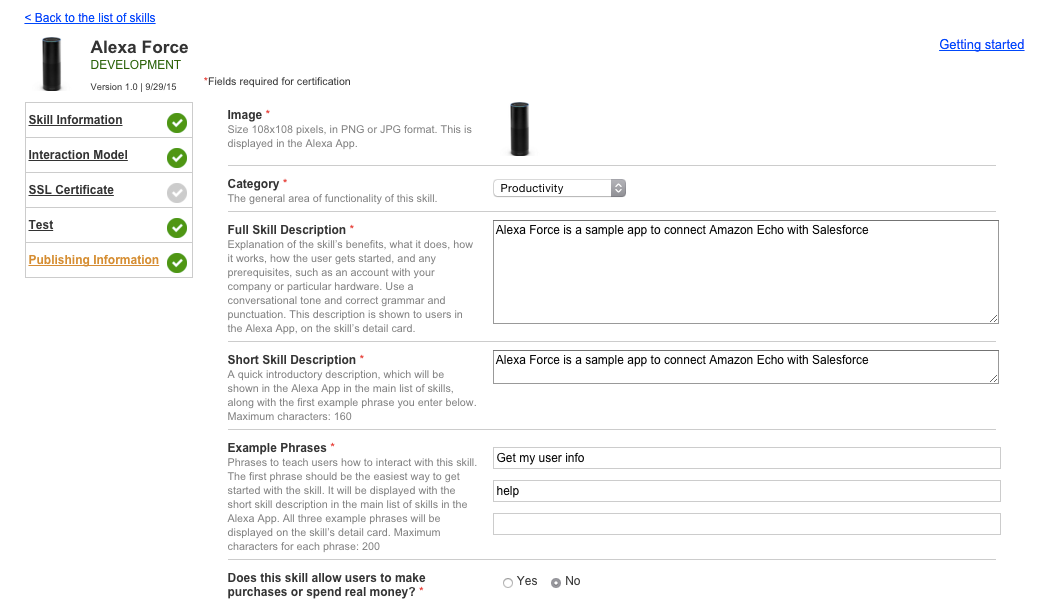
And account linking:
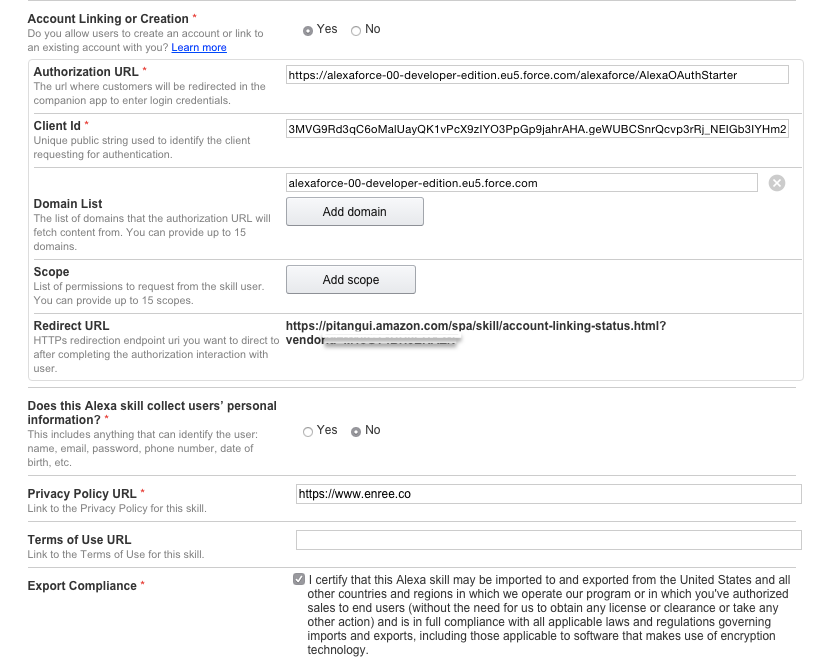
This configuration can only be completed when the Connected app has been created so you can link you Salesforce account to the skill: Alexa will be sending to Salesforce REST service the authorization token got when activating the skill on the Alexa site.
For now get the
Redirect URL and write it down somewhere but select
Account Linking or Creation to
No (we'll be activating this further).
The skill is half configured: to complete the configuration we need some Salesforce configuration.
The skill is now connected to your developer account, so it is shown in the
Skill section of your
https://alexa.amazon.com site.
Implement your skill in Apex
First thing to create is a new Skill class by creating a new
AlexaSkill object:
AlexaSkill skill = new AlexaSkill();
skill.setApplicationId('amzn1.echo-sdk-ams.app.APP_ID');
skill.addIntent(new AlexaUserInfoIntent());
skill.addIntent(new AlexaForceHelpIntent());
skill.addIntent(new AlexaForceStopIntent());
skill.addOnLaunchIntent(new AlexaForceHelpIntent());
return skill;
The
setApplicationId sets the application you got from the first page of configuration of the skill on the Amazon site.
The next lines create the new intents.
Each intent is an extension of the
AlexaIntent class:
public class AlexaForceHelpIntent extends AlexaIntent{
    public AlexaForceHelpIntent(){
        super('AlexaForceHelp');
        List<AlexaIntent.Slot> slots = new List<AlexaIntent.Slot>();
        List<String> utterances = new List<String>();
        utterances.add('Help');
        utterances.add('What to do');
        utterances.add('What can i do');
        utterances.add('What can you do');
        utterances.add('Help me');
        this.setSlots(slots);
        this.setUtterances(utterances);
    }

    public override ASkillResponse execute(ASkillRequest request){
        String responseText = 'You can use ask for Salesforce info. For example try asking Alexaforce for "my user".';
        return this.say(responseText, null, null, null, false);
    }
}
The intent have to provide:
- Its describe informations, such as the slots you will use and the utterances (both are not mandatory but suggested to help the configuration phase of the skill)
- The implementation of the execute() method that handles the code behind the intent
The
AlexaSkill class, among various getters and setters (to get/get utterances, slots and the name) provides an helper method to automatically create a response, the
say() method.
You can pass the following parameters
say(String text, String cardTitle, String cardContent, String reprompt, Boolean shouldEndSession):
- text: text to be "said" by Alexa
- cardTitle: title of the card sent to your alexa app (void for no card)
- cardContent: content of the card
- reprompt: reprompt sentence
- shouldEndSession: this response will or will not close the current session
The
AlexaSkill class provides the following methods:
- getIntentSchema(): provides a JSON rapresentation of the intent's schema. This will be exposed by the REST service we are going to implement
- getUtterances(): provides a JSON rapresentation of the intent's utterances. Exposes by the REST service
- addOnLauchIntent(): (and remove method) allow to set an intent called when you call your skill without saying any of the utterances (e.g. Alexa ask alexaforce. This may be used to guide the user
- addIntent(): (and remove method) adds an intent to the skill
- addDefaultIntent(): (and remove method) this is an intent that is called when Alexa asks for an intent but this has not (yet) been implemented (not mandatory)
- execute(): this method has 2 implementation, we'll be using the one returning a String and getting a String as the only parameters: this method simply accepts a request JSON string and output the JSON response (this is the core method of the skill)
This classes use the
ASkillRequest and
ASkillResponse classes that rapresent the JSON request and response object.
Implement the Apex REST service
Once we have implemented our skills, we can create our new Skill REST service:
@RestResource(urlMapping='/AlexaRestTest/*')
global class AlexaRestTest {
    @HttpGet
    global static void get(){
        AlexaSkillRESTApp.handleGet(createAlexaSkill());
    }
    @HttpPost
    global static void post(){
        AlexaSkillRESTApp.handlePost(createAlexaSkill());
    }

    //Creates a new Skill
    private static AlexaSkill createAlexaSkill(){
        AlexaSkill skill = new AlexaSkill();
        skill.setApplicationId('amzn1.echo-sdk-ams.app.APP_ID');
        skill.addIntent(new AlexaUserInfoIntent());
        skill.addIntent(new AlexaForceHelpIntent());
        skill.addIntent(new AlexaForceStopIntent());
        skill.addOnLaunchIntent(new AlexaForceHelpIntent());
        return skill;
    }

}
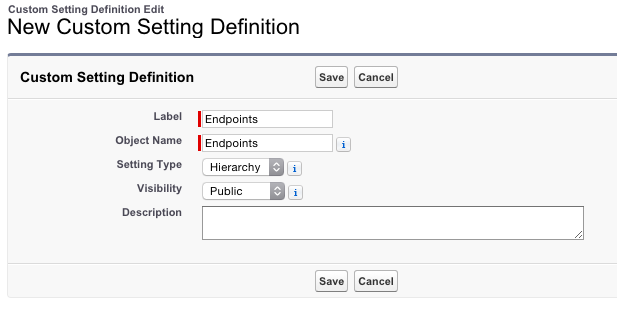
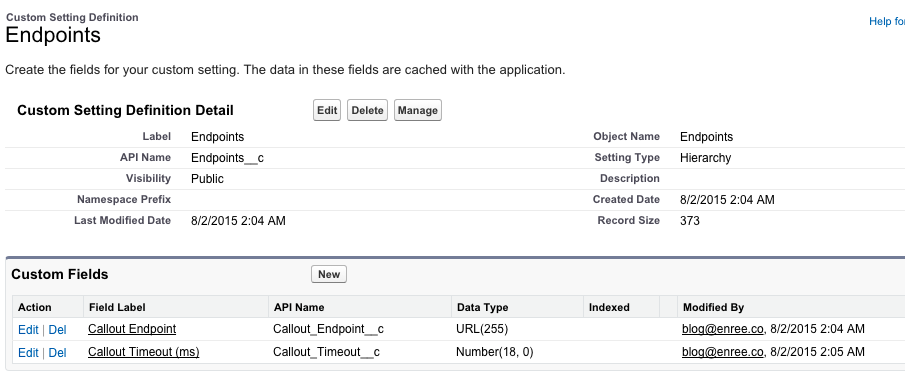
This REST service uses the
AlexaSkillRESTApp helper class that handles the GET and POST methods: this class implements a simple Debug process by registering every request/response couple in the
RestLog__c Sobject:
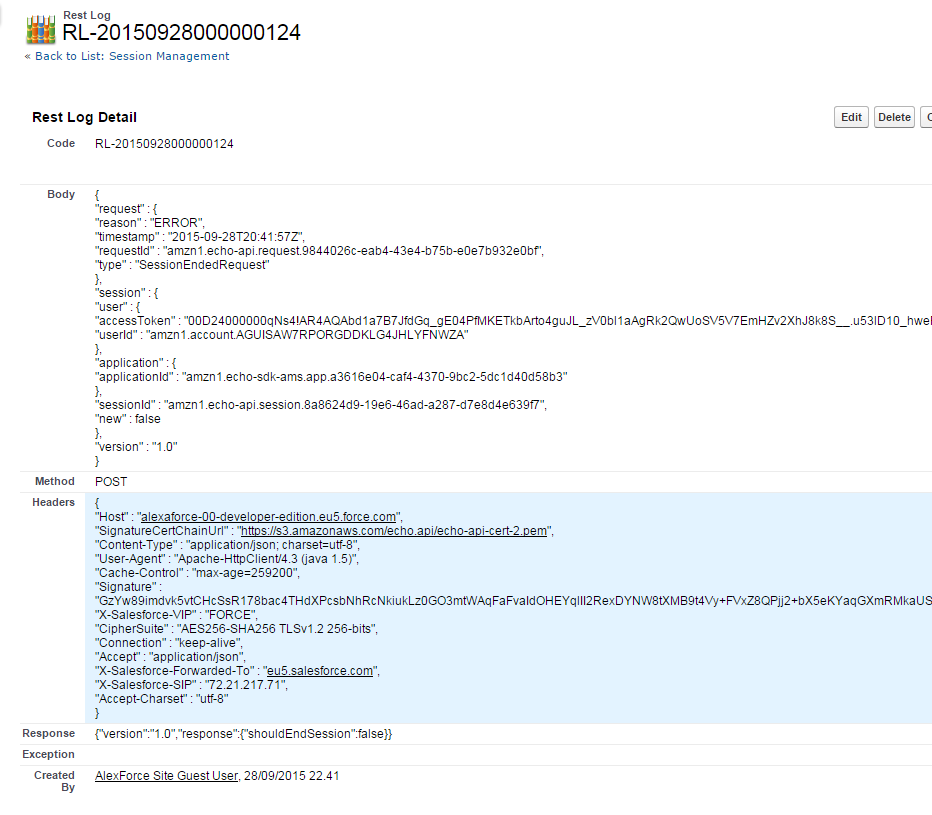
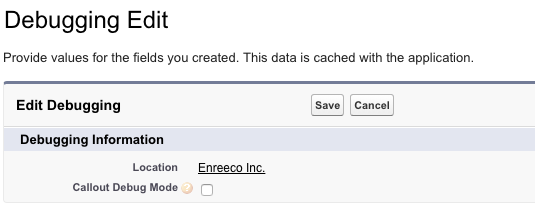
You can disable this behavior changing the following member on the
AlexaSkillRESTApp class to return
false:
public class AlexaSkillRESTApp {

    //Enable debug
    public static BOOLEAN ENABLE_DEBUG{
        get{
            //to be replace with a CS / Custom Metadata
            return true;
        }
    }
    //. . .
}
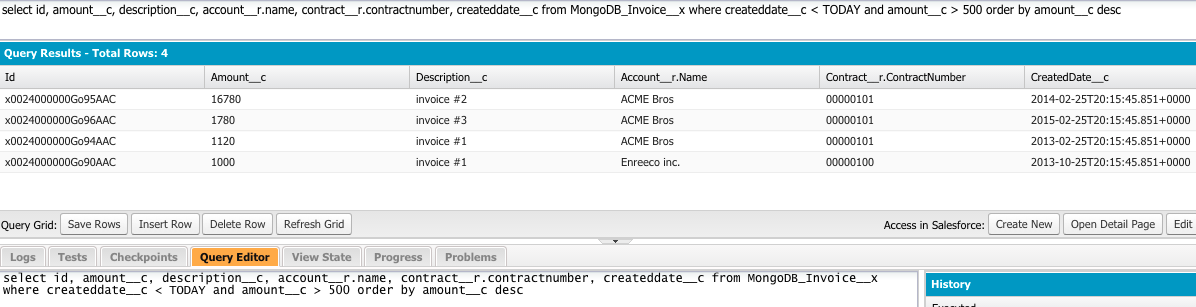
The
GET method supports the parameter
schema to which you can pass the values
utterances to get the JSON rappresentation to be copied in the skill configufation on the Amazon Developer site or leave it blank to get all the intant definitions.
E.g. https://alexaforce-00-developer-edition.eu5.force.com/alexaforce/services/apexrest/AlexaRestTest?schema=utterances
Outputs:
SFUserInfo get my user info
SFUserInfo get my user
SFUserInfo my user
SFUserInfo user info
AlexaForceHelp Help
AlexaForceHelp What to do
AlexaForceHelp What can i do
AlexaForceHelp What can you do
AlexaForceHelp Help me
AlexForceStop Stop
AlexForceStop Bye
AlexForceStop Bye bye
AlexForceStop Shut up
AlexForceStop Shut the fuck up
AlexForceStop Go to sleep
AlexForceStop sleep
E.g. https://alexaforce-00-developer-edition.eu5.force.com/alexaforce/services/apexrest/AlexaRestTest?schema
Outputs:
{
  "intents" : [ {
    "slots" : [ ],
    "intent" : "SFUserInfo"
  }, {
    "slots" : [ ],
    "intent" : "AlexaForceHelp"
  }, {
    "slots" : [ ],
    "intent" : "AlexForceStop"
  } ]
}
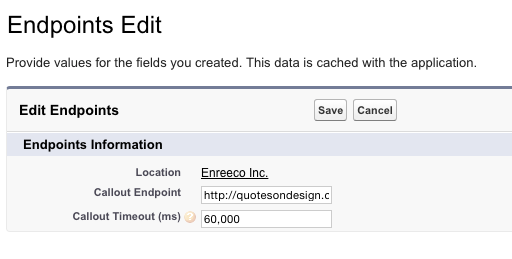
The next step is to configure a public endpoint (es. the one provided in the example) to make this REST service available.
Configure the Community
The Salesforce community will be used to give public access to the REST service we'll be implementing, to get a custom domain and to allow different profiles to get logged in into the community.
Go to
Setup > Communities > Settings and enable Communities and create a custom domain (e.g.
alexaforce-00-developer-edition.eu5.force.com).
Now create a new community and activate it:
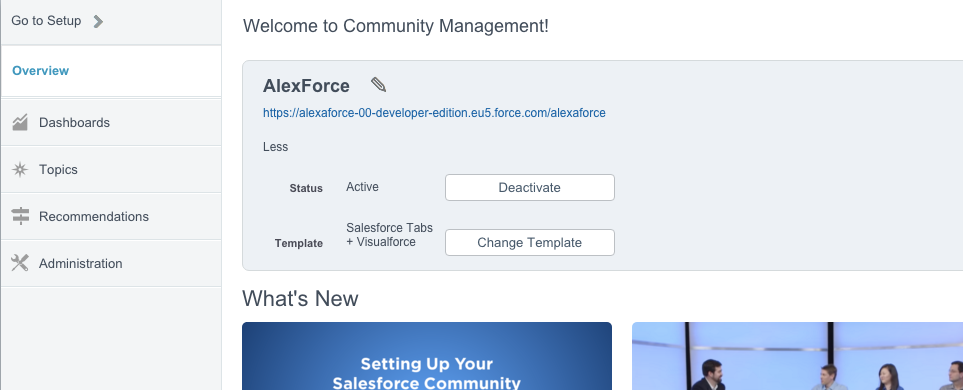
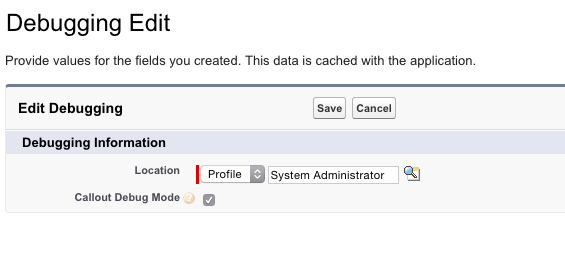
Add the profiles you want to log into the community:
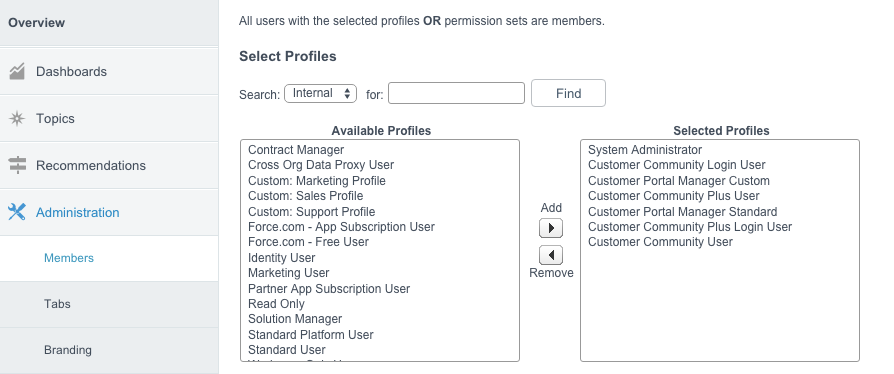
The community allow branding so you can change default styling (color and logo) with few clicks.
This is not the only valid solution (you could have used a simple Site with custom Visualforce pages).
Make the REST service public
Go to
Setup > Developer > Sites and search for the Community site just created:
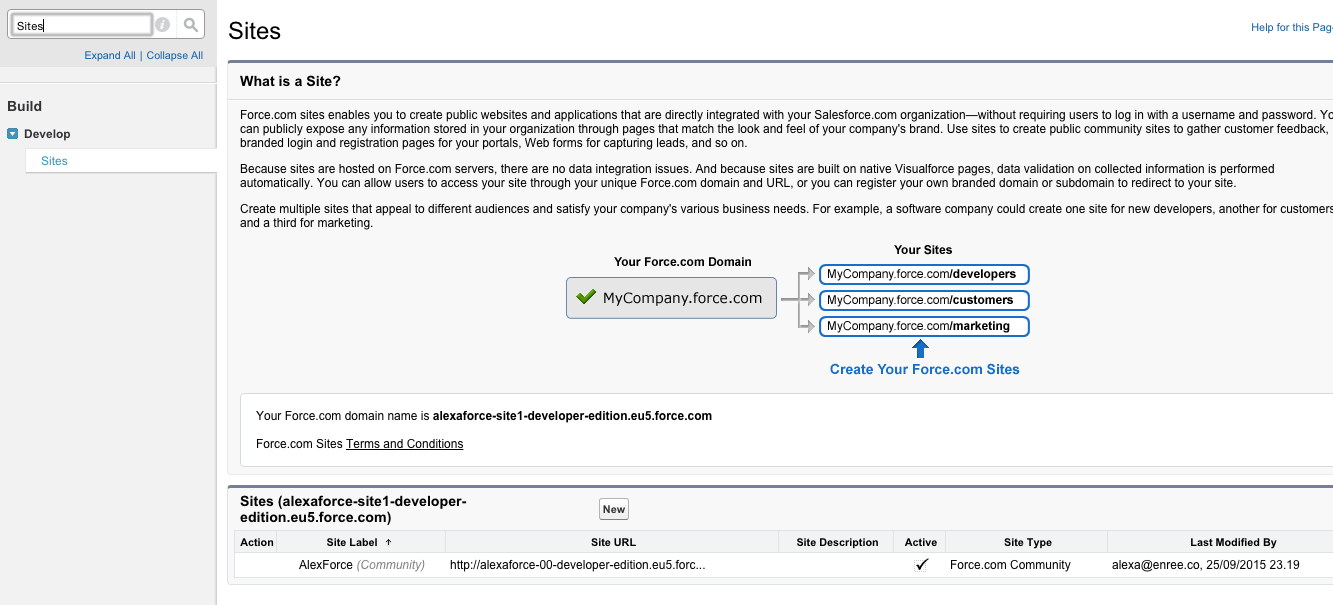
Click on its name:
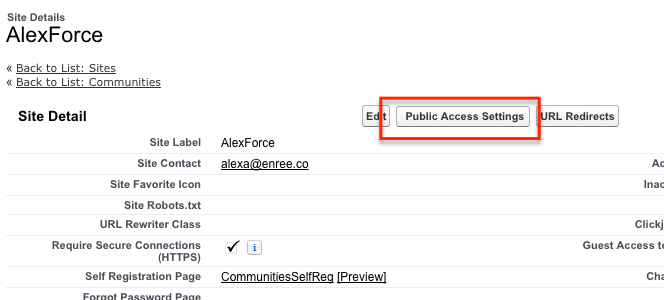
And then on
Public Access Settings. Search for the
Enable Apex Class Access Settings and add the
AlexaRestTest class:

This way your service will be accessible outside with the endpoint
https://[community_base_url]/[community_endpoint_folder]/services/apexrest/AlexaRestTest: note that the
[community_endpoint_folder] is not mandatory when configuring the Community access url.
You have to set this endpoint on the skill's configuration:
Last step is to configure the account linking.
Implement a connected intent
In the code provided you have an intent that does a simple request that requires a valid session ID:
public class AlexaUserInfoIntent extends AlexaIntent{

    public AlexaUserInfoIntent(){
        super('SFUserInfo');
        List<String> utterances = new List<String>();
        utterances.add('get my user info');
        utterances.add('get my user');
        utterances.add('my user');
        utterances.add('user info');
        this.setUtterances(utterances);
    }

    public override ASkillResponse execute(ASkillRequest request){
        Http h = new Http();
        HttpRequest req = new HttpRequest();
        //change this with your current community folder name (or leave blank string)
        String communityFolder = '/alexaforce';
        String endpoint = URL.getSalesforceBaseUrl().toExternalForm()+communityFolder+'/services/Soap/c/34.0';
        req.setMethod('POST');
        req.setEndpoint(endpoint);
        req.setHeader('Content-Type', 'text/xml; charset=utf-8');
        req.setHeader('SOAPAction','getUserInfo');

        String authToken = request.session.user.accessToken;

        String soapBody = '<?xml version="1.0" encoding="utf-8"?><soapenv:Envelope xmlns:soapenv="http://schemas.xmlsoap.org/soap/envelope/" xmlns:urn="urn:enterprise.soap.sforce.com">  <soapenv:Header><urn:SessionHeader><urn:sessionId>'
                    +authToken+'</urn:sessionId></urn:SessionHeader></soapenv:Header><soapenv:Body><urn:getUserInfo /></soapenv:Body></soapenv:Envelope>';

        req.setBody(soapBody);
        HttpResponse resp = h.send(req);
        Dom.Document doc = resp.getBodyDocument();
        //Retrieve the root element for this document.
        Dom.XMLNode soapenvEnvelope  = doc.getRootElement();
        String SOAPENV_NS = 'http://schemas.xmlsoap.org/soap/envelope/';
        String NS = 'urn:enterprise.soap.sforce.com';
        Dom.XMLNode bodyNode = soapenvEnvelope.getChildElement('Body', SOAPENV_NS);
        Dom.XMLNode userinfoRespNode = bodyNode.getChildElement('getUserInfoResponse', NS);
        Dom.XMLNode resultNode = userinfoRespNode.getChildElement('result', NS);
        Dom.XMLNode fullnameNode = resultNode.getChildElement('userFullName',NS);
        String fullName = fullnameNode.getText();
        String responseText = 'Your user\'s full name is '+fullName;
        return this.say(responseText, 'Salesforce User Info', responseText, null, true);
    }
}
The intent's execute() method makes a call getting the (SOAP) UserInfo info about the current users associated to the authorization token provided with the request received (
request.session.user.accessToken value): the response will be Alexa telling "You user's full name is ...".
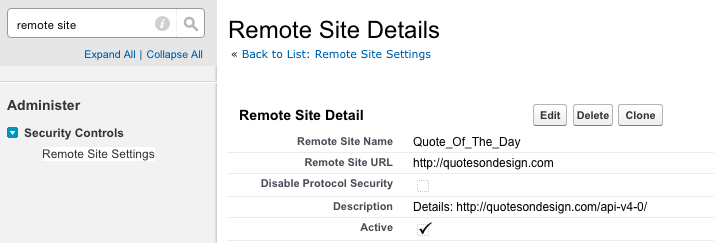
Remember to add a Remote Site Setting configuration to your community domain, otherwise the callouts won't work.
The code is not optimized at all (you have to change the
communityFolder variable to fit to your Community configuration).
Create a Connected App
Let's enable OAuth within the Salesforce Org:
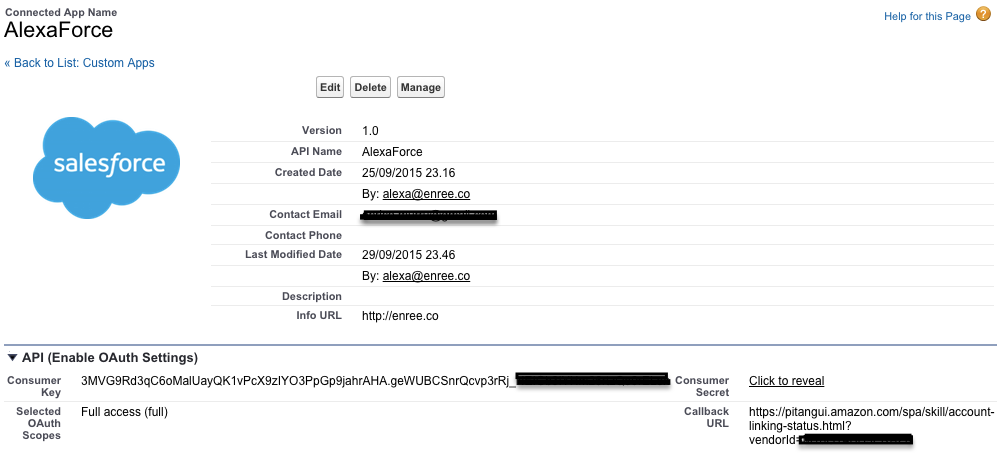
The
Callback URL is set with the
Redirect URL of the Skill configuration in the Amazon developer site (the one got at the beginning of the article).
The
Consumer Key will be filled the
Client Id field on the Skill configuration in the Amazon developer site (see the first part of this article)
The last piece of configuration of the Account Linking is the
Authorization URL that should be the the Community's login page like
https://alexaforce-00-developer-edition.eu5.force.com/alexaforce/login: unfortunately when linking accounts Amazon's Alexa Skills page doesn't sends to the login page the
redirect_uri parameter that is mandatory for successfull Salesforce OAuth process completion.
That's why we need a custom login page that will be a proxy to the real login page: this is the
AlexaOAuthStarter Visualforce page.
Open its controller class named
AlexaOAuthStarterController:
public class AlexaOAuthStarterController {

    //Load action executed by the visualforce page called by Alexa's linked account attempt
    //ATTENTION: change the "communityName" and "alexaOauthCallbackURL" variables with the
    //correct values
    public PageReference onLoad(){
        //change this with your current community folder name (or leave blank string)
        String communityFolder = '/alexaforce';
        //redirect uri configured in the Alexa Skill configuration
        String alexaOauthCallbackURL = 'https://pitangui.amazon.com/spa/skill/account-linking-status.html?vendorId=XXXXXXXXX';
        String communityURL = URL.getSalesforceBaseUrl().toExternalForm()+communityFolder;
        PageReference page = new PageReference(communityURL+'/services/oauth2/authorize');
        for(String k : ApexPages.currentPage().getParameters().keyset()){
            page.getParameters().put(k, ApexPages.currentPage().getParameters().get(k));
        }
        //appends the "redirect_uri" that amazon's configuration does not send
        //this class should be configured to change depending on the context (1 visualorce page per skill?)
        page.getParameters().put('redirect_uri',alexaOauthCallbackURL);
        return page;
    }
}
Replace the following variables:
- communityFolder: replace with your community endpoint folder, if any
- alexaOauthCallbackURL: the redirect URL got from Alexa's skill configuration
This page will be your entry point for the authorization process.
Remember to enable this page to all the Community's profiles.
Let's finalize the configuration
Go again on the Alexa's skill configuration page and let's add the remainig configurations:
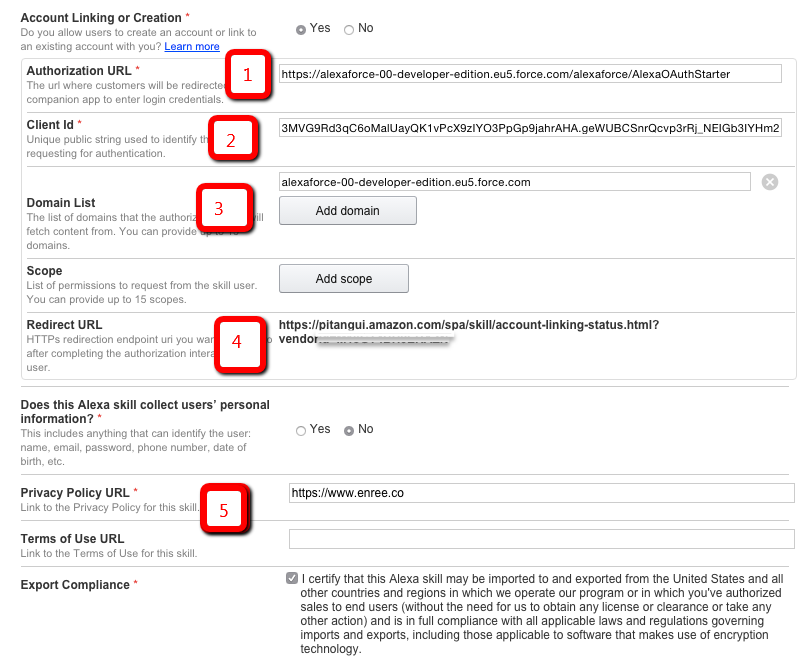
Where:
- https://[community_base_url]/[community_endpoint_folder]/AlexaOAuthStarter
- Consumer Key of the Connected App
- The domain of the community ([community_base_url])
- The redirect URL you have set up in the Connected App
- Add a fake URL for the privacy policy
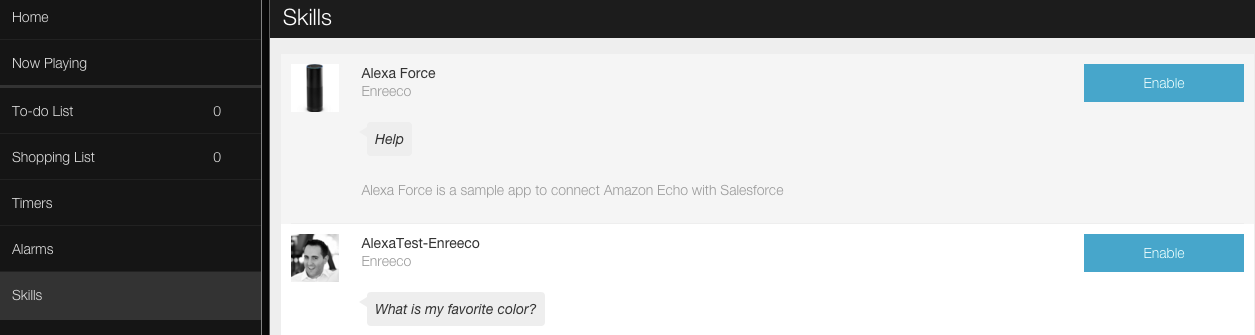
Connect your skill
Your skill is ready to be used.
Go to the
Skill section of your
https://alexa.amazon.com site:
And click
Enable (Chrome blocks the popup, so pay attention to the warning massages):
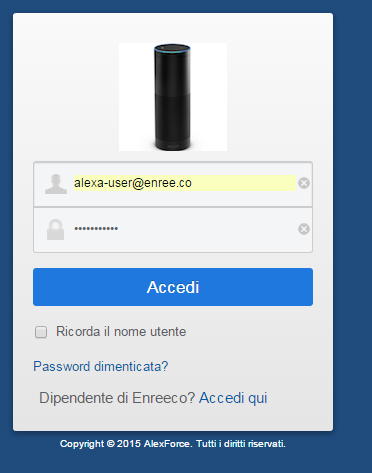
After you login allow the Connected App:
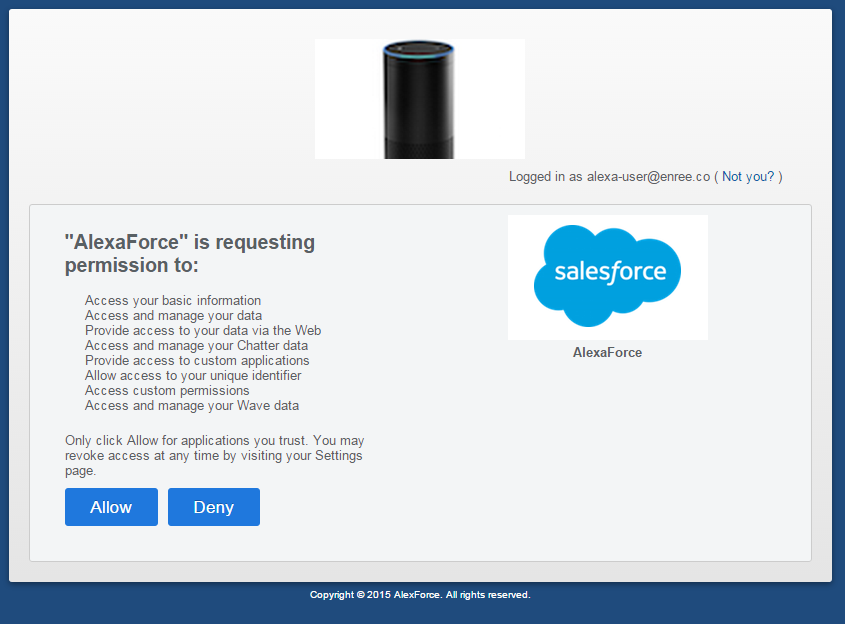
And you'll be redirected to the following page (that you can close):
Now Alexa has your access token to make requests to your Community's API interface (whether it is via SOAP or REST).
Remember:
Salesforce sessions don't last forever and the Amazon Skill documentation states that you are forced to disable and re-enable the skill if you have to refresh the access token.
Now try to say
Alexa ask alexaforce for my user and she'll magically cry out your name!
You have no excuse to develop some awesome app integrating Alexa with Salesforce.
Enjoy!