Showing posts with label Single Sign On. Show all posts

Monday, April 11, 2016

[Salesforce / Heroku] Salesforce as Identity Provider and Heroku as Service Provider

One year from my last SSO blog post (Implementing Delegated SSO) I'm still here playing with Single Sign On, this time using SAML 2.0.

For a quick overview of the how SAML works, read SAML FEDERATION FOR DUMMIES and SAML for dummies.

We have 3 actors:
  • Client: this is your browser
  • Service Provider: this is the remote Site where you need to access your private data/services without having to log in in this portal (this is Heroku in our demo implementation)
  • Identity provider: this is the server that hosts your authentication details, which authenticates your private sessions on the Service Provider (this is Salesforce)

These actors speak to eachother to allow the client to be authenticated both in the Service Provider and the Identity Provider.

The aim of this article is to configure Salesforce as an Identity Provider using a NodeJS app hosted on Heroku as Service Provier.

Let's say we have a Customer Community and every user should access a remote Service Provider without the need to log in again.


First let's configure a new Community


From Setup > All Communities click on New Community, select the Salesforce Tabs + Visualforce template, select a name:


Click on the Administration tab and then to Members. Leave the System Administrator and add a customer community profile:


Click on Branding to change header image and color theme.

Click on Login & Registration to change header logo of login page and other login/logout settings.

You have setup a new community:


Setup Salesforce as Identity Provider


The next step is to setup Salesforce as Identity Provider.

Enable My Domain from Setup > Domain Managerment > My Domain.

Remember that once the My Domain subdomain is setup you cannot change it anymore.

By deploying the domain you enable it for all your ORG's users:
  • Users will be able to login from https://yourdomain.my.salesforce.com/login
  • if you don't change the base settings, users will still be able lo login through https:/login.salesforce.com
  • Integrations will continue to work without any problem

You can even change login brand:
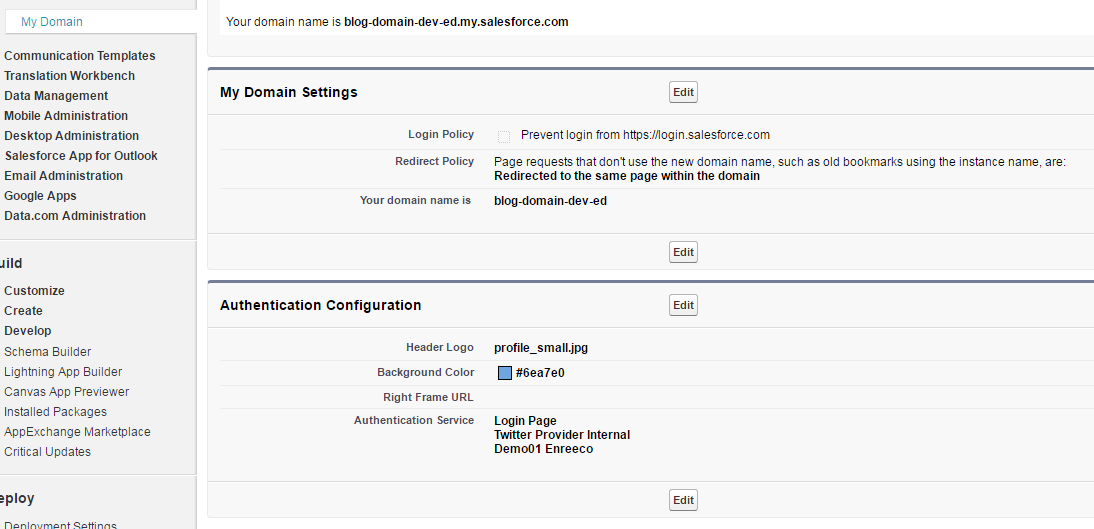


Now go to Setup > Security Controls > Identity Provider click Enable Identity Provider.


Single Sign On is almost here!
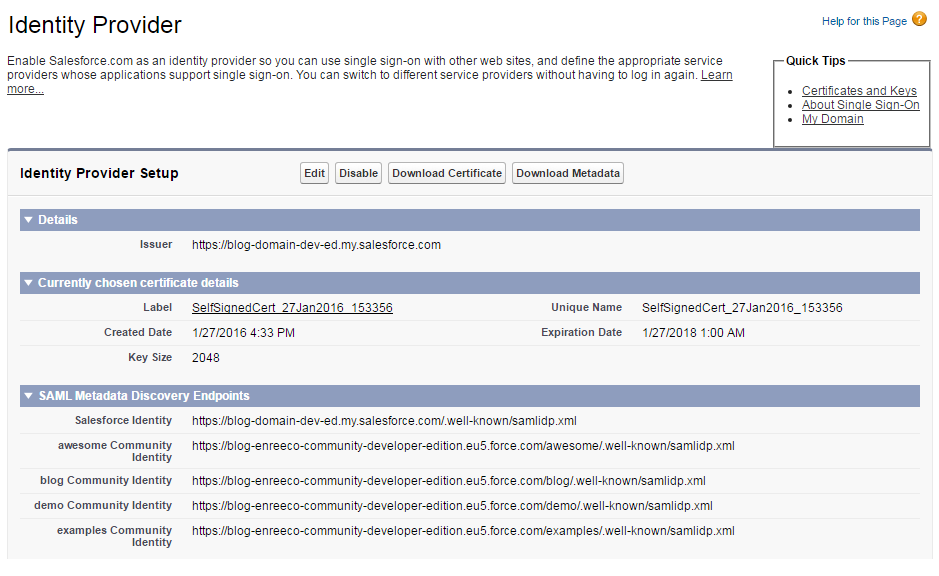

For every community and the base Salesforce Identity you are provided with the SAML descriptor to configure Single Sign On on the remote Service Provider.

There is one more step to properly configure the authentication channel.


Create a connected app


From Setup > Create > Apps click on New button of the Connected Apps section.


Fill in the mandatory fields:
  • Connected App Name: name of your app
  • API Name: dev name of the app (cannot be changed once set)
  • Enable SAML: true
  • Entity Id: this is the unique identifier of your Service Provider. This field is unique across Connected Apps (any other connected app should have a different value)
  • ACS URL: this is the callback URL on your Service Provider (we'll be configuring the app in the next chapter)
  • Subject Type: set to User ID (your user will be identified by its Salesforce ID)
  • Name ID Format: this is the format of the unique id (urn:oasis:names:tc:SAML:1.1:nameid-format:unspecified)
  • Issuer: leave the default value

Another cool feature is the Custom Connected App Handler: you can specify an Apex class which is called when the authentication is done.

The class must extend the Auth.ConnectedAppPlugin class:

global class SamlConnectedAppPlugin extends Auth.ConnectedAppPlugin{

    global override boolean authorize(Id userId, Id connectedAppId, boolean isAdminApproved) {
        User u = [select id, First_SAML_Login__c from User where id =: userId].get(0);
        if(u.First_SAML_Login__c == null){
            u.First_SAML_Login__c = System.now();
            try{
                update u;
            }catch(exception e){
                System.debug('Exception:' + e.getMessage());
            }
        }
        return true;
    }


    global override Map customAttributes(Id userId, Map formulaDefinedAttributes) {  
        User u = [select id, Name, CommunityNickname from User where id =: userId];
        formulaDefinedAttributes.put('nickname',u.CommunityNickname);
        formulaDefinedAttributes.put('fullname',u.Name);
        return formulaDefinedAttributes;
    }
}

Where:
  • authorize(): authorized user based on custom login (e.g. you can query for a given User's field)
  • customAttributes(): allow to specify a set of custom attributes to be sent to the Service Provider. In this example the send the user's full name and nickname
  • refresh(): (not implemented here) is called upon token refresh (OAuth 2.0)


Configure the Service Provier


The service provider is the external App that provides a service which can be accessed only if the user if authenticated.

It will be using Salesforce as the Identity Provider (don't you say??).

To simulate the Service Provider, here is a NodeJS app hosted on Heroku:


By clicking the Heroku Button you are redirected to the Heroku app creation:


In the Config Variables lays down the magic:

  • SAML_ENTRYPOINT: set with the value of the node md:SingleSignOnService Binding="urn:oasis:names:tc:SAML:2.0:bindings:HTTP-Redirect" of the SAML descriptor for the community
  • SAML_ISSUER: set with the name you have setup in the Entity Id of your connected app
  • SAML_CERT: copy the whole certificate string in the node ds:X509Certificate of the SAML descriptor of your community
  • SAML_IDENTIFIER_FORMAT: leave with the default value urn:oasis:names:tc:SAML:1.1:nameid-format:unspecified
  • APP_NAME: set a cool name for your service provider
  • SF_HOME: this is the base URL for your community


Then click the Deploy For Free button and wait for the magic to take place!

Your Heroku app is up and running at https://heroku_app_name.herokuapp.com


Link the Service Provider in your community


Let's add a simple link to the community sidebar.

Click to Setup > Customize > Home > Custom links:


Create a new Home Page Component:


And add it to a new Home Page Layout tailored to your community:


Let's test it out!


Monday, March 9, 2015

[Salesforce / SSO] Implementing Delegated SSO


Playing with code is cool, but playing with useless stuff is even better :)

Ok, I'm kidding, I just want to say that sometimes you have to get your hands dirty to understand what lies underneath things and try to build useless stuff to see simple "Hello world!" appear!

This is the case of Delegated SSO.

Few weeks ago with Paolo (a colleage of mine), I was checking deeper on Salesforce SSO, trying to figure out from the docs how to implement it.

The first thing that came across my eyes was the difference between Delegated and Federated SSO.
It wans't that clear at that time, that's why Paolo played with the code for some time and did a cool thing that I reproduced in the following Github repo.

Federated SSO is done using well known protocols such as SAML, granting a secure identity provisioning: with Microsoft ADFS you can use your own company domain to log on your Salesforce CRMs as well.

Which is the problem with this kind of SSO?

To implement its bases you don't need a single line of code.


Too bad we are dirty men that like to play with mud!


That's why this post!


With Delegated SSO you need 2 actors:
  • An Identity provider (e.g. your Domain server)
  • The Salesforce ORG in which you want to be logged in without remembering username/password

The first wall you splash into is the fact the you have your ORG to be enabled to Delegated SSO: this should be enabled by Salesforce support, so you need a way to contact support (if you're not using an ORG with built in support).

After your ORG is enabled to Delegated SSO, this is where the config has to be enabled in your "delegated" ORG:

The Delegated Gateway URL contains the URL of the webservice of the "delegating" server.

Then you have to enable the Is Single Sign-On Enabled flag in the Administrative Permissions section of your users' profile.

This is where we got our hands dirty while making out research: why not using a Salesforce ORG as the identity provider?

Challenge accepted!

What happens with delegated SSO? When you try to log in into your delegated ORG, Salesforce at first try to access the "Delegated SSO" webservice: if this accept the request, than you are automatically logged in; if the server gives a KO, than the ORG checks for username/password to be correct.

This is the message that the delegated ORG sends to the identity provider:
<?xml version="1.0" encoding="UTF-8" ?>
<soapenv:Envelope
   xmlns:soapenv="http://schemas.xmlsoap.org/soap/envelope/">
   <soapenv:Body>
      <Authenticate xmlns="urn:authentication.soap.sforce.com">
         <username>sampleuser@sample.org</username>
         <password>myPassword99</password>
         <sourceIp>1.2.3.4</sourceIp>
      </Authenticate>
   </soapenv:Body>
</soapenv:Envelope>

It basically asks for a user/password couple with a source IP, and receives this response:
<?xml version="1.0" encoding="UTF-8"?>
<soapenv:Envelope 
   xmlns:soapenv="http://schemas.xmlsoap.org/soap/envelope/">
   <soapenv:Body>
      <AuthenticateResult xmlns="urn:authentication.soap.sforce.com">
         <Authenticated>false</Authenticated>
      </AuthenticateResult>
   </soapenv:Body>
</soapenv:Envelope>

The Authenticated field conveys the OK/KO result.

You can use the password field to host a unique and temporary token to make the connection more secure.

To log-in from your identity provider page, use this example page (see the /apex/DelegateLogin page):

Each of this users is a delegated user on another ORG, that is stored in the DelegatedUser__c SObject:

It stores Username and Remote ORG ID, because it is used to create the login URL to make the authentication go smootly for the user:
public PageReference delegateAuthentication(){
 String password = generateGUID();
 insert new DelegatedToken__c(Token__c = password, 
         Username__c = this.usr.DelegatedUsername__c,
         RequestIP__c = getCurrentIP());
 String url = 'https://login.salesforce.com/login.jsp?'
    +'un='+EncodingUtil.urlEncode(this.usr.DelegatedUsername__c, 'utf8')
    +'&orgId='+this.usr.Delegated_ORG_ID__c 
    +'&pw='+EncodingUtil.urlEncode(password, 'utf8')
    +'&rememberUn=0&jse=0';
 //you can also setup a startURL, logoutURL and ssoStartPage parameters to enhance usre experience
 PageReference page = new PageReference(url);
 page.setRedirect(false);
 return page;
}

This way you can request a login action for every user you have stored in your objects (this case has the same ORG but you can have wathever ORG you want, no limits); the token is stored in a DelegatedToken__c SObject that is used to handle temporary tokens, usernames and IPs: this way, when the delegated ORG asks our ORG with this infos, our webservice can succesfully authenticate the requesting user.

This is done through the public webservice exposed by the RESTDelegatedAuthenticator class:
    @HttpPost
    global static void getOpenCases() {
        RestResponse response = RestContext.response;
        response.statusCode = 200;
        response.addHeader('Content-Type', 'application/xml');
        Boolean authResult = false;
        try{
            Dom.Document doc = new DOM.Document(); 
            doc.load(RestContext.request.requestBody.toString());  
            DOM.XMLNode root = doc.getRootElement();
            Map<String,String> requestValues = walkThrough(root);
            
            
            authResult = checkCredentials(requestValues.get('username'), 
                                          requestValues.get('password'),
                                          requestValues.get('sourceIp'));
        }catcH(Exception e){
            insert new Log__c(Description__c = e.getStackTraceString()+'\n'+e.getMessage(), 
                       Request__c = RestContext.request.requestBody.toString());
        }finally{
            insert new Log__c(Description__c = 'Result:'+authResult, 
                       Request__c = RestContext.request.requestBody.toString());
        }
        String soapResp = '<?xml version="1.0" encoding="UTF-8"?>'
            +'<soapenv:Envelope xmlns:soapenv="http://schemas.xmlsoap.org/soap/envelope/">'
            +'<soapenv:Body>'
            +'<authenticateresult xmlns="urn:authentication.soap.sforce.com">'
            +'<authenticated>'+authResult+'</Authenticated>'
            +'</AuthenticateResult>'
            +'</soapenv:Body>'
            +'</soapenv:Envelope>';
        response.responseBody = Blob.valueOf(soapResp);
    }

This webservice simply checks the incoming SOAP XML request, extracts the fields on the request and tests its values with the checkCredentials() method.

If the token is not expired you'll be succesfully redirected to the new ORG logged as the user you wanted to.

A good practice is to use custom domains: you can thus replace "login.salesforce.com" with your "My Domain" of the corresponding ORG (you can also add a new field on the DelegatedUser__c SObject.

To enable public webservice, you simlpy need to create a new Site:

Then click on your Site, click the button "Public Access Setting" and add the RESTDelegatedAuthenticator to the Apex classes accessible by this public profile.

The comple code is right here in this Github repository.

May the Force.com be with you!