Saturday, May 28, 2016

[Salesforce] The Sobject Crusade: ApexTestResult

Source: ApexTestResult

After you execute a test class (ApexTestQueueItem), you'll get the test results of a given test method execution.

To query this information use the ApexTestResult object.

The object conveys the following fields:

  • ApexClassId: the test class
  • ApexLogId: the ApexLog object (if log is enabled)
  • AsyncApexJobId: the main aync job (this is the same as ApexTestQueueItem.ParentJobId) to which the given test execution belongs
  • Message: the exception message, only if an exception occurs
  • MethodName: the test method name of the given log
  • Outcome: the result of the test method execution (Fail, Pass, CompileFail)
  • QueueItemId: lookup to the ApexTestQueueItem the result belogs to
  • StackTrace: exception stack trace (if any)
  • TestTimestamp: test execution date/time

To launch a test, see the instructions on the ApexTestQueueItem object page.

Now you can query for the results:

Select Id, ApexClass.Name, MethodName, ApexLogId, Outcome, TestTimestamp, AsyncApexJobId, QueueItemId From ApexTestResult order by TestTimestamp DESC


Given this failing test class:

@isTest
private class ExceptionTestClass {
    
    private static testmethod void failMethod(){
     update new Case(Subject = 'Test');
    }
}

The execution will lead to a test error:

[Salesforce] The Sobject Crusade: ApexTestSuite

Source: ApexTestSuite

String '16 comes with a handy feature regarding test execution, the Test Suites.

They are a collection of tests ment to be run together organized in a single suite.

To access the test suite open your Developer Console and click Test > New Suite and enter the Suite name:


Then select all test classes you want to run in the suite:


In the Test > Suite Manager menu item you can change a suite's configuration, while in Test > New Suite Run you can choose which suites to execute.


The Settings button allows to set the maximum number of failuers allowd, so the test suite ends its run immediately after a given number of exceptions are thrown.

Clicking Run the tests are executed and presented on the Tests tab on the lower side of the Developer console:


You can query the Object easily.

Select Id, TestSuiteName From ApexTestSuite


To check for the classes involved in the suite you need to query the TestSuiteMembership that links Apex classes to the Suite, but it is another story.

[Salesforce] The Sobject Crusade: ApexTestQueueItem

Source: ApexTestQueueItem

The ApexTestQueueItem object gives you access to the underlying test item for a given test job for a given class.

If you don't know what is a test class refer to this article to get started: a test class is a class used to (guess what?) test a set of apex classes / triggers in order to verify and certify the features of your implementation.

Every ORG must have at least 75% of code coverage (here for more details), that is your test classes should cover at least 75% of the lines you have written in your Apex classes.

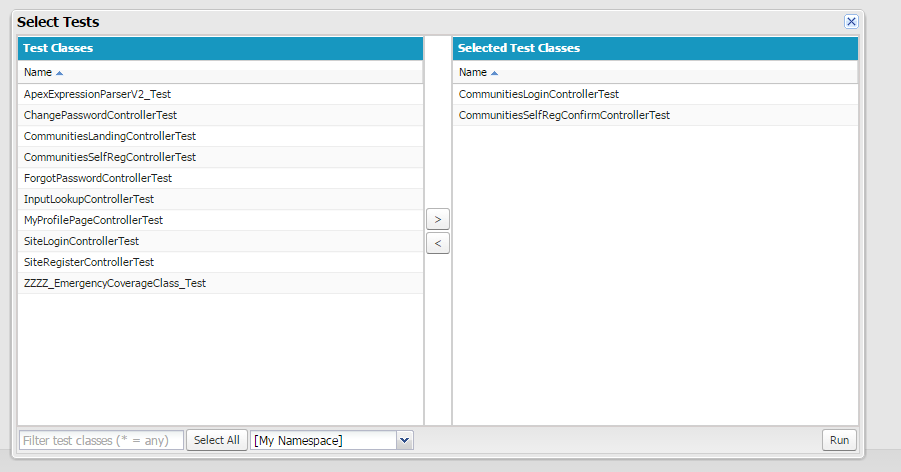
To execute a test class (or a set of test classes), go to Your Name > Developer Console, click on Test menĂ¹, select New Run and then select the test classes you want to execute:


On the lower part of the console you can see the test executing:


You can now query all the single job items (the second level of the tree):

select id, ApexClass.Name, ExtendedStatus, ParentJobId, Status, CreatedDate from ApexTestQueueItem order by CreatedDate desc


You can update a ApexTestQueueItem to change its status if you want to abort the job (setting Status to Aborted), or you can insert a new ApexTestQueueItem object: this will create a new Process Job, e.g.:

ApexTestQueueItem item = new apextestqueueitem();
item.ApexClassId = [select id from apexclass where name = 'CommunitiesLandingControllerTest'].Id;
insert item;

Thursday, May 19, 2016

[Salesforce / Lightning] #Cool Modal Dialog Component

Here we go with another simple UI component, made up with the new Lightning Design System.

Here you go a simple Modal dialog box.

For those of the TL;DR tribem here is the GitHub repository.

The component is ment to be placed in your app in this way:

<c:ModalDialog type="{!v.dialogType}" 
                   title="{!v.dialogTitle}" 
                   content="{!v.dialogContent}" 
                   showDialog="{!v.showDialog}"
                   context="{!v.dialogContext}"
                   inputValue="{!v.dialogInputValue}"
                   inputPlaceholder="{!v.dialogInputPlaceholder}"
                   onClose="{!c.dialogCallback}" />

And to be waken up by a boolean variable (in this case by v.showDialog).

When you switch this variabile to true/false the modal behaves as expected (shows up or closes).

This kind of architecture allow for a single callback after the modal closes, so you need a way to know what to do after this close event.

That is to say that you need to be aware of the context that triggered the modal.

The context parameter is a Javascript object that can contain wathever you want (I used an "action" string for instance, but you can put wathever variables you want) and is passed through to the onClose callback, here is an example:

{
    //ModalDialogTestAppController.js
    //. . .
    showAlert: function(component, event, helper) {
        $A.run(function(){
            helper.showDialog(component, 
                              'ALERT', //dialog type
                              'THIS IS AN ALERT!', //modal title
                              'Hello world!', //modal content
                              null, //input default string (only for "INPUT" type)
                              null, //input placeholder (only for "INPUT" type)
                              {
                                  action: helper.C.ACTIONS.SHOW_ALERT,
                                  anotherValue: Date.now(),
                              }, //context object
                              true); //show the dialog
        });
    },

The component supports the following parameters:

  • type:this is the type of dialog you want to open. Supports: ALERT, CONFIRM, INPUT, LOADER
  • title: title of the modal dialog
  • content: content text of the modal dialog
  • showDialog: boolean value that indicates if the modal is shown/hidden
  • context: Javascript object containing the context you want to be passed back to the callback invocation
  • inputValue: default value of the input field (only for INPUT type)
  • inputPlaceholder: placeholder for the input field (only for INPUT type)
  • onClose: callback called after the ModalDialogCloseEvt event is fired by the modal dialog component

The onClose callback is fired upon the ModalDialogCloseEvt event that supports the following parameters:
  • dialogType: the type of the calling dialog
  • confirmResult: true if the user pressed YES/OK buttons (always false for ALERT, LOADER)
  • inputResult: input written by the user (set only if type is INPUT and user pressed the OK button)
  • context: context sent to the component

These are the different kinds of dialogs:

ALERT


CONFIRM


INPUT


LOADER


And here it is the test app in action:


Monday, May 16, 2016

[Salesforce] The Sobject Crusade: ApexPage

Source: ApexPage

The ApexComponent, as you would expect, is the record for the Visual Force Component.

Note that, even if the describe states that the ApexPage is creatable and updatable, an exception is thrown if you try to insert/update via API a class: use the tooling API or metadata API instead.

Among the fields, you can query for the markup of the component, its Apex controller.

Here an example:

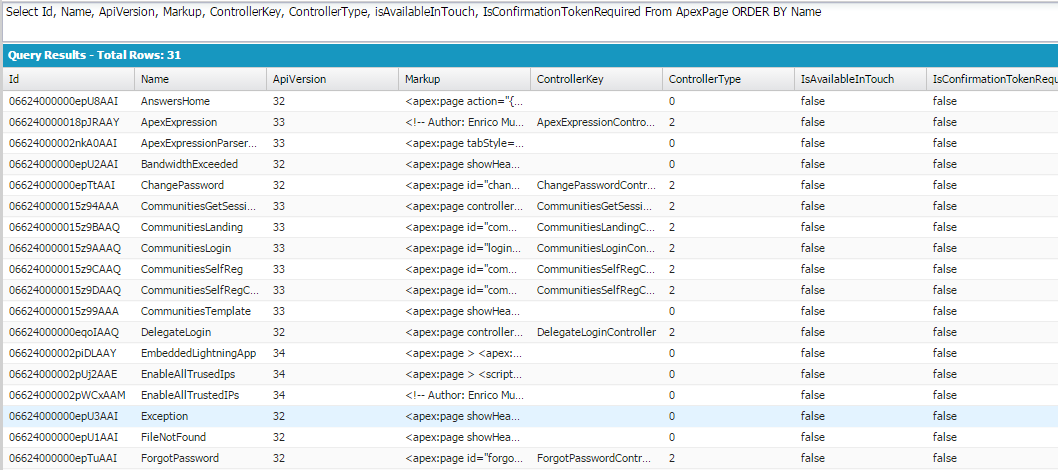
Select Id, Name, ApiVersion, Markup, ControllerKey, ControllerType, isAvailableInTouch, IsConfirmationTokenRequired From ApexPage ORDER BY Name


THe IsConfirmationTokenRequired flag can be updated in the standard UI or in the Developer Console (under Settings button) and is used to allow Secure Cross Site Request Forgery.

What is it?

This is a way to secure your pages when using GET requests, i.e. when you make changes to the Data Model that should not be looped with, e.g., subsequent GET requests.

How does it work?

Salesforce appends a unique token (per user / session), that is a 128 bit (16 chars) string, in the page URL with the _CONFIRMATIONTOKEN parameter: this token can be used only once, and the VisualForce engine automatically handles the parameter validity.

Unfortunately this mechanism is provided only when overriding the delete standard button-

Let's make a try.

Let's create a new Visual Force page (no action indeed):

<apex:page standardController="Case">
 <b>THIS ACTION WILL BE EXECUTED ONCE</b>
</apex:page>

This is a page with a standard controller that actually does nothing, but it is just to prove what we are trying to do.

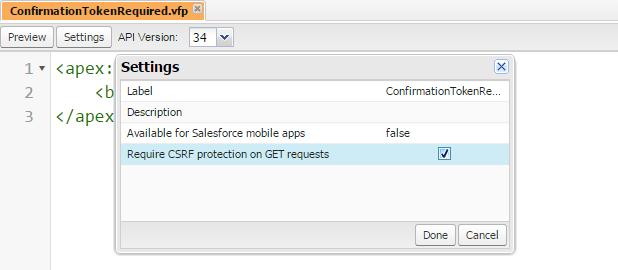
Click on the Settings button on the developer console to enable the Require CSRF protection on GET requests flag:


If you try to load the page manually, you'll get this wonderful error:


If you append the _CONFIRMATIONTOKEN parameter with a random value, the message changes:


If we find a way to pass the correct token, we'll see the page.

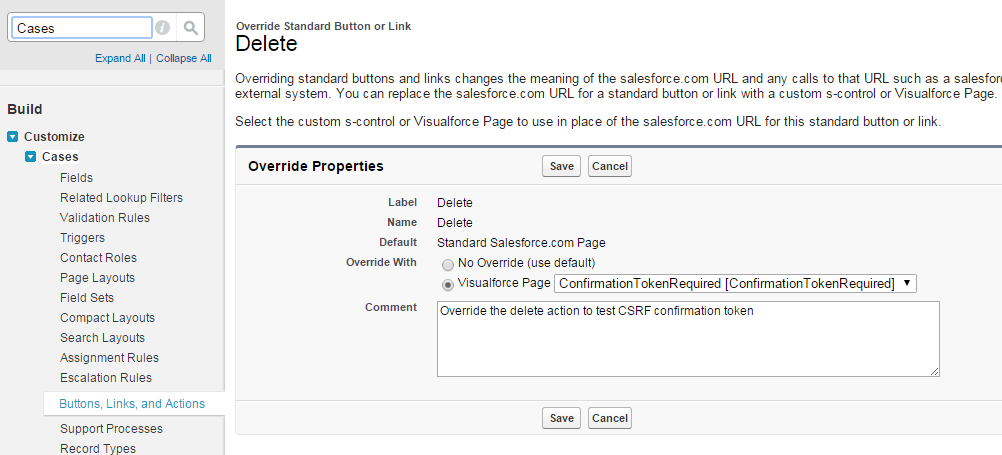
As said, the only way to make Salesforce generate that token, is to override the delete button action.

Go to Setup > Customize > Cases > Buttons, Links and Actions and click Edit next to the Delete action:


Now try to delete a Case:


Salesforce will be releasing in the next future this feature for other actions.

[Salesforce] The Sobject Crusade: ApexLog

Source: ApexLog

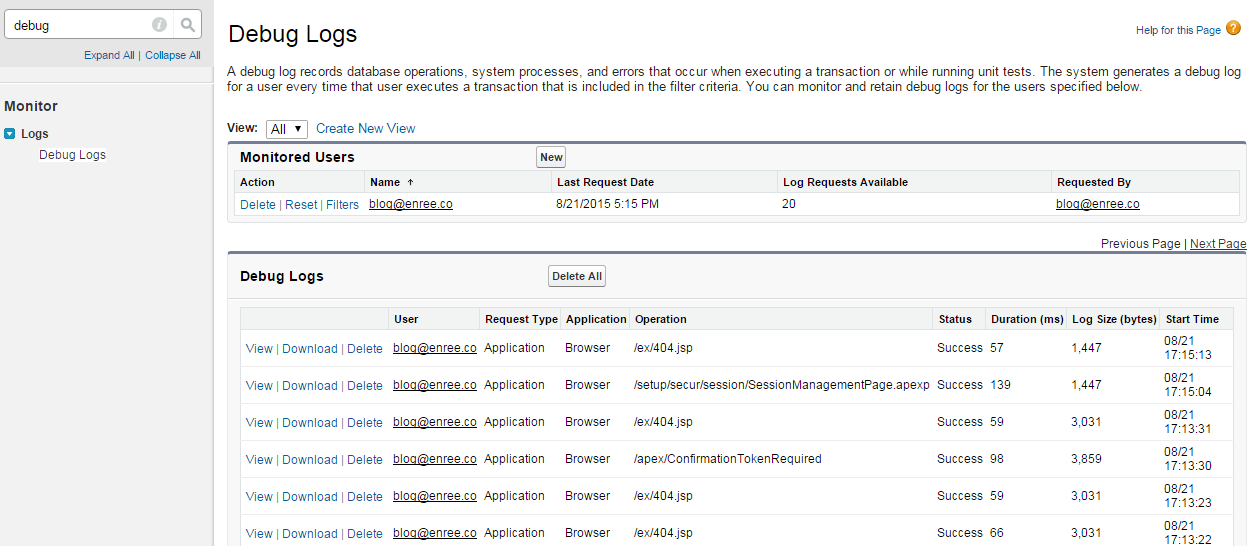
The ApexLog gives access to the Debug Log.

To enable log monitoring for a user, go to Setup > Logs > Debug Logs and click the New button to add an user.


These rows can be queried:

select id, StartTime, Application, DurationMilliseconds, Location, LogLength, LogUser.Name, Operation, Status from apexlog order by StartTime DESC


You can read all the infos regarding the given apex log, such as the User, kind of request, the size of the log, its status, but you cannot access the raw content: to get to the raw content you have to make a Tooling API request to the endpoint:

GET https://xxx.salesforce.com/services/data/v34.0/sobjects/ApexLog/[APEXLOG_ID]/Body/
 Headers:
  Authorization: Bearer [SESSION_TOKEN]

The session token could be grabbed with an anonymous Apex call to UserInfo.getSessionId() or using the OAuth Password flow described in the ActionLinkGroupTemplate object.

This is what you get:

34.0 APEX_CODE,FINEST;APEX_PROFILING,INFO;CALLOUT,INFO;DB,INFO;SYSTEM,DEBUG;VALIDATION,INFO;VISUALFORCE,INFO;WORKFLOW,INFO
17:13:22.020 (20181893)|EXECUTION_STARTED
17:13:22.020 (20210501)|CODE_UNIT_STARTED|[EXTERNAL]|06624000003BOE1|VF: /apex/ConfirmationTokenRequired
17:35:30.036 (36842637)|CODE_UNIT_FINISHED|execute_anonymous_apex
17:35:30.038 (38198449)|EXECUTION_FINISHED
17:13:22.040 (40498571)|CODE_UNIT_STARTED|[EXTERNAL]|ApexDataSource:MongoDBDataSrouceProvider
17:13:22.040 (40523619)|CODE_UNIT_STARTED|[EXTERNAL]|ApexDataSource:MongoDBDataSrouceProvider
17:13:22.043 (43448400)|HEAP_ALLOCATE|[71]|Bytes:3
17:13:22.043 (43497592)|HEAP_ALLOCATE|[76]|Bytes:152
17:13:22.043 (43514859)|HEAP_ALLOCATE|[272]|Bytes:408
17:13:22.043 (43534730)|HEAP_ALLOCATE|[285]|Bytes:408
17:13:22.043 (43553779)|HEAP_ALLOCATE|[379]|Bytes:48
17:13:22.043 (43582592)|HEAP_ALLOCATE|[131]|Bytes:6
17:13:22.043 (43605101)|HEAP_ALLOCATE|[EXTERNAL]|Bytes:6
17:13:22.043 (43624664)|METHOD_ENTRY|[1]|01p2400000AgxCj|MongoDBDataSrouceProvider.MongoDBDataSrouceProvider()
17:13:22.043 (43630791)|STATEMENT_EXECUTE|[1]
17:13:22.043 (43636403)|STATEMENT_EXECUTE|[1]
17:13:22.043 (43641248)|METHOD_EXIT|[1]|MongoDBDataSrouceProvider
17:13:22.043 (43660705)|HEAP_ALLOCATE|[EXTERNAL]|Bytes:4
17:13:22.043 (43671735)|VARIABLE_SCOPE_BEGIN|[1]|this|MongoDBDataSrouceProvider|true|false
17:13:22.043 (43713117)|VARIABLE_ASSIGNMENT|[1]|this|{}|0x74896a31
17:13:22.043 (43758665)|SYSTEM_CONSTRUCTOR_ENTRY|[EXTERNAL]|()
17:13:22.043 (43866237)|SYSTEM_CONSTRUCTOR_EXIT|[EXTERNAL]|()
17:13:22.043 (43880333)|STATEMENT_EXECUTE|[1]
17:13:22.043 (43892018)|CODE_UNIT_FINISHED|ApexDataSource:MongoDBDataSrouceProvider
17:13:22.044 (44048812)|HEAP_ALLOCATE|[EXTERNAL]|Bytes:4
17:13:22.044 (44059804)|SYSTEM_MODE_ENTER|false
17:13:22.044 (44067540)|VARIABLE_SCOPE_BEGIN|[7]|this|MongoDBDataSrouceProvider|true|false
17:13:22.044 (44087738)|VARIABLE_ASSIGNMENT|[7]|this|{}|0x74896a31
17:13:22.044 (44101508)|STATEMENT_EXECUTE|[7]
17:13:22.044 (44104497)|STATEMENT_EXECUTE|[8]
17:13:22.044 (44112485)|HEAP_ALLOCATE|[8]|Bytes:4
17:13:22.044 (44182135)|SYSTEM_CONSTRUCTOR_ENTRY|[8]|()
17:13:22.044 (44204845)|SYSTEM_CONSTRUCTOR_EXIT|[8]|()
17:13:22.044 (44210268)|VARIABLE_SCOPE_BEGIN|[8]|capabilities|List|true|false
17:13:22.044 (44237205)|HEAP_ALLOCATE|[EXTERNAL]|Bytes:4
17:13:22.044 (44259684)|VARIABLE_ASSIGNMENT|[8]|capabilities|{"s":1,"v":[]}|0x3ce93902
17:13:22.044 (44264466)|STATEMENT_EXECUTE|[9]
17:13:22.044 (44381336)|SYSTEM_METHOD_ENTRY|[9]|List.add(Object)
17:13:22.044 (44408889)|HEAP_ALLOCATE|[EXTERNAL]|Bytes:4
17:13:22.044 (44420907)|SYSTEM_METHOD_EXIT|[9]|List.add(Object)
17:13:22.044 (44426463)|STATEMENT_EXECUTE|[10]
17:13:22.044 (44439376)|SYSTEM_METHOD_ENTRY|[10]|List.add(Object)
17:13:22.044 (44453626)|HEAP_ALLOCATE|[EXTERNAL]|Bytes:4
17:13:22.044 (44462615)|SYSTEM_METHOD_EXIT|[10]|List.add(Object)
17:13:22.044 (44466873)|STATEMENT_EXECUTE|[11]
17:13:22.044 (44476051)|SYSTEM_MODE_EXIT|false
17:13:22.044 (44490717)|CODE_UNIT_FINISHED|ApexDataSource:MongoDBDataSrouceProvider
17:13:22.061 (61085594)|CUMULATIVE_LIMIT_USAGE
17:13:22.061 (61085594)|LIMIT_USAGE_FOR_NS|(default)|

[Salesforce] The Sobject Crusade: ApexComponent

Source: ApexComponent

The ApexComponent, as you would expect, is the record for the Visual Force Component.

Note that, even if the describe states that the ApexComponent is creatable and updatable, an exception is thrown if you try to insert/update via API a class: use the tooling API or metadata API instead.

Among the fields, you can query for the markup of the component, its Apex controller.

Here an example:

Select Id, Name, ApiVersion, Markup, ControllerKey, ControllerType, From ApexComponent ORDER BY Name

Monday, May 9, 2016

[Salesforce] The Sobject Crusade: ApexClass

Source: ApexClass

The ApexClass is the most beloved object for Salesforce Developers.

It identifies a specific Apex Class, so you can query for Classes runtime.

Note that, even if the describe states that the ApexClass is creatable and updatable, an exception is thrown if you try to insert/update via API a class: use the tooling API or metadata API instead.

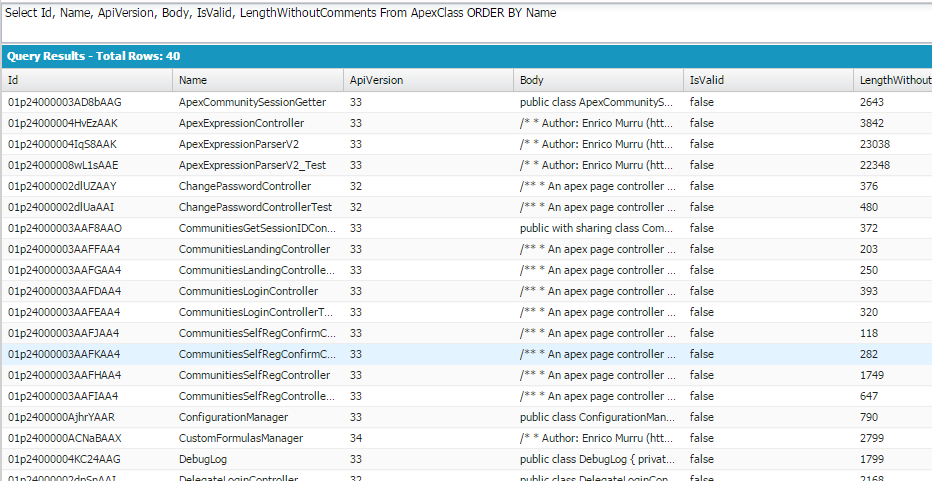
Among the fields, you can query for the Body of the class, whether it is valid or not, size in byte without comments.

Here an example:

Select Id, Name, ApiVersion, Body, IsValid, LengthWithoutComments From ApexClass ORDER BY Name

[Salesforce] The Sobject Crusade: Announcement

Source: Announcement

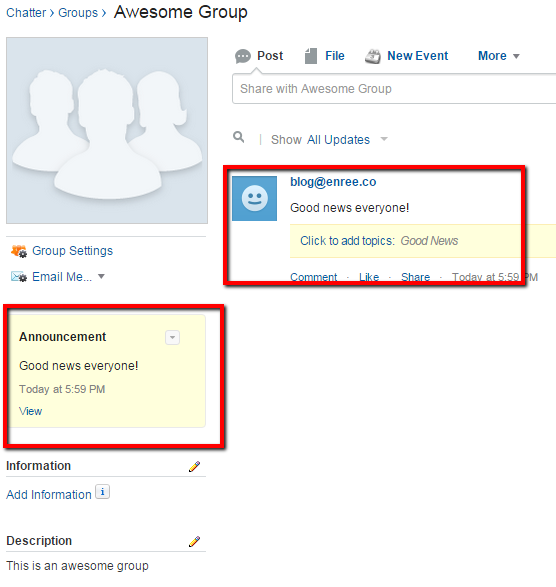
This object represents a Chatter Group Announcement.

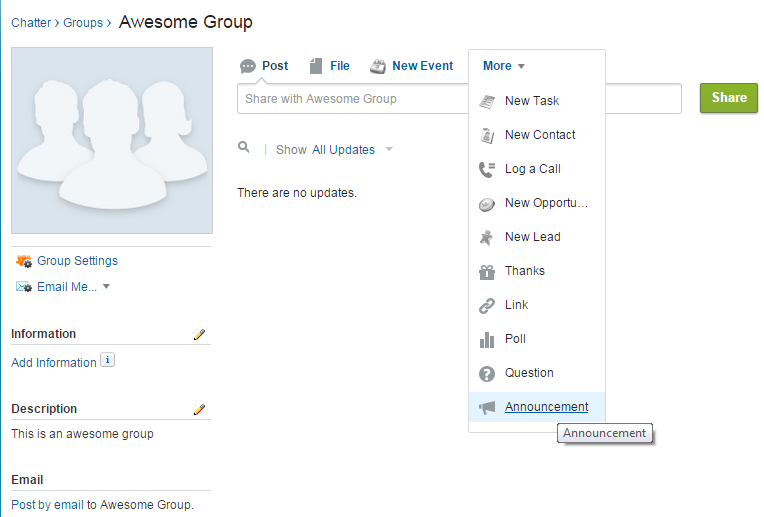
To create a new announcement, go to the Chatter tab, select (or create) a group:


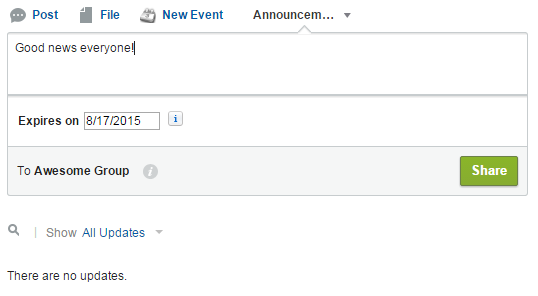
Click on More > Announcement and select the body of the announcement and an expiration date:


A section will compare on the Group's sidebar:


The Announcement object is a detail of the FeedItem object that specifies the Expiration Date of the feed. Given the following query:

select FeedItem.Body, ExpirationDate, Parent.Name from Announcement


To create the object programmatically follow these rules:

//query the Collaboration Grouop
CollaborationGroup group = [Select Id From CollaborationGroup Where Name = 'Awesome Group'];

//creates a feed item; type "AdvancedTextPost" is mandatory
FeedItem item = new FeedItem(Type='AdvancedTextPost', ParentId=group.Id, Body='This is an awesome announcement');
insert item;

//create the announcement
Announcement anc = new announcement(FeedItemId=item.Id, ExpirationDate=System.today().addDays(10));
insert anc;

//upate the group
group.AnnouncementId=anc.Id
update group;

Wednesday, May 4, 2016

[Salesforce / Lightning Connect] Lightning Connect Custom Adapters and MongoDB (DML support) pt.2

Do you remember the Lightning Connect Custom Adapters and MongoDB post?

Things have changed after that post and finally the platform supports all DML statements: insert, update and delete!

To make the magic work I had to make:

Follow the post instructions to setup up your Heroku app.

The core changes are the support for the methods.

Open the MongoDBDataSrouceProvider.cls class:

override global List getCapabilities() {
 List capabilities = new List();
 capabilities.add(DataSource.Capability.ROW_QUERY);
 capabilities.add(DataSource.Capability.SEARCH);
 //new capabilities added
 capabilities.add(DataSource.Capability.ROW_CREATE);
 capabilities.add(DataSource.Capability.ROW_UPDATE);
 capabilities.add(DataSource.Capability.ROW_DELETE);

 return capabilities;
}

The provider has been added with more capabilities, CREATE, UPDATE and DELETE.

Let's open the MongoDBDataSourceConnectio.cls class and look at the 2 new methods:

global override List<DataSource.UpsertResult> upsertRows(DataSource.UpsertContext context) {
    List<DataSource.UpsertResult> results = new List<DataSource.UpsertResult>();
    List<Map<String, Object>> rows = context.rows;
    Http h = new Http();
    
    for(Integer i = 0; i < rows.size(); i++){
        Map<String,Object> row = rows[i];
        HttpRequest request = new HttpRequest();
        request.setHeader('Content-Type','application/json');
        request.setTimeout(60000);
        Map<String,Object> invoice = new Map<String,Object>();
        if(String.isBlank((String)row.get('ExternalId'))){
            request.setMethod('POST');
            request.setEndpoint(DB_ENDPOINT_NC);
        }else{
            request.setMethod('PUT');
            request.setEndpoint(DB_ENDPOINT_NC+'/'+row.get('ExternalId'));
        }
        
        invoice.put('accountid', row.get('Account'));
        invoice.put('contractid', row.get('Contract'));
        invoice.put('created', row.get('CreatedDate'));
        invoice.put('amount', row.get('Amount'));
        invoice.put('description', row.get('Description'));
        
        request.setBody(JSON.serialize(invoice));
        
        HttpResponse response = h.send(request);
        
        List<Object> mList = (List<Object>)JSON.deserializeUntyped(response.getBody());
        Map<String, Object> m = (Map<String, Object>)mList[0];
        if (response.getStatusCode() == 200){
            String objId = String.valueOf(m.get('_id'));
            if(String.isBlank(objId)){
                objId = String.valueOf(row.get('ExternalId'));
            }
            results.add(DataSource.UpsertResult.success(objId));
        } 
        else {
            results.add(DataSource.UpsertResult.failure(
                String.valueOf(row.get('ExternalId')), 'The callout resulted in an error: ' + response.getStatusCode()+' - '+response.getBody()));
        }
    }
    return results;
}

global override List<DataSource.DeleteResult> deleteRows(DataSource.DeleteContext context) {
    List<DataSource.DeleteResult> results = new List<DataSource.DeleteResult>();
    Http h = new Http();
    
    for (String externalId : context.externalIds){
        HttpRequest request = new HttpRequest();
        request.setHeader('Content-Type','application/json');
        request.setTimeout(60000);

        request.setMethod('DELETE');
        request.setEndpoint(DB_ENDPOINT_NC+'/'+externalId);
        
        HttpResponse response = h.send(request);
        if (response.getStatusCode() == 200
            || response.getStatusCode() == 201){
            results.add(DataSource.DeleteResult.success(String.valueOf(externalId)));
        } 
        else {
            results.add(DataSource.DeleteResult.failure(
                String.valueOf(externalId), 'The callout resulted in an error: ' + response.getStatusCode()+' - '+response.getBody()));
        }
    }
   return results;
}


WARNING: this code is not optimized for bulk upsert/delete because it makes a callout for every record.


It's a proove of concept, so I challenge you to bulkify the class!

How can you insert an external object provided by a Lightning Connect adapter?

The Database class has been provided with new methods:

  • deleteAsync
  • insertAsync
  • updateAsync

These methods are used to make the calls to the remote system and actually do the work!

Database.insertAsync(new List<MongoDB_Invoice__x>{
    new MongoDB_Invoice__x(Amount__c=1, Description__c ='Async Test 1'),
    new MongoDB_Invoice__x(Amount__c=2, Description__c ='Async Test 2')
});
Database.deleteAsync([Select Id From MongoDB_Invoice__x Where Description__c = 'Async Test 1']);

Every method has an alternative method that provides a callback class, which allows to make further actions after the records are upserted/deleted.

For instance, the asyncUpdate has an optional second parameter of type Database.AsyncSaveCallback that can be created to execute some logic after a specific record is done (the class is called every time a record is updated).

Every asyncDML method returns a List of Database.DeleteResult or Database.SaveResult that contains a link to the asynchrounous operation that can be retrieved by calling the Database.getAsyncLocator(result) method and passing the value to the Database.getAsyncSaveResult(asyncLocator) or Database.getAsyncDeleteResult(asyncLocator): this way you can get the status of the asynchronous operation.