Showing posts with label Apex. Show all posts

Monday, August 7, 2017

[Salesforce / Apex] Cleanse your data with super powers: Execute Anonymous Batch

Warning: use this only if you have super powers and you know exactly what you are going to do!

Developers are always lazy people, they prefer (love) writing scripts to handle data cleansing.

I rarely use Data Loader or massive CSV updates using other tools if I can, I always prefer to write my own scripts to update fields, if I'm asked to and, ofcourse, if it is possibile.

The only problem with this approach is that sometimes the logic you implemented in your script cannot be run for more than a couple of objects a time, requiring you to run your script on and on...and this is not good for lazy people.

Talking with my friend and colleague Tonone, he asked me if I had already did something like:

  • A way to execute an Apex script in batch style (hell yeah, this is an Apex batch class)
  • He didn't want to deploy in production every new script (well, this can't be a normal batch class)
  • He wanted to provide the algorithm dynamically (still nope in batch)

Just after telling him that he cannot execute an anonymous batch class from the console (or in the ORGanizer ;) ) in Execute Anonymous mode, I tought why don't put together a Batch class and an Execute Anonymous call?


To the idea behind this is to create a batch class that executes at each iteration a script provided that is executed in "anonymous" style across all the batch's scopes objects.

If you want to jump to the code, check out this Github repo.

If you want watch the tool in actiom jump to the Let's play section.

Getting a Session ID


The only way to invoke Salesforce APIs from a batch job is to make a login call from the script to obtain a Session ID or (easier) to create a named credentials logged with OAuth 2.0.

To get to this create a new Connected App (from Setup > Apps > Connected App):


Save the Consumer Key and Consumer Secret for next step, while the Callback URL will be filled with a fake url (e.g. http://fake.com).

Now create an Authorization Provider ( Setup > Auth. Provider):


Use your org's full address for the Authorize and Token Endpoint URLs (whether you have My Domain activated or not) and place Consumer Key and Consumer Secret of the previous step.

After saveing you have the callback URL needed to convalidate the OAuth 2.0 dance:


Take the Callback URL and put it in the same field of the Connected App.

Finally let's create the Named Credential (from Setup > Named Credentials):


After saving the credential you are requested to login with your user (you need admin access or at least an API enabled user to call execute anonymous feature).

The APi name of the credential must match the one provided in the ExecuteAnonymousBatch class:

public class ExecuteAnonymousBatch implements Database.Batchable<SObject>, Database.AllowsCallouts, Database.Stateful {
    private static final String API_VERSION = '40.0';
    private static final String NAMED_CREDENTIAL = 'EXECUTE_ANONYMOUS';

Now you can make API call from asyncrhrous jobs.

Let's play


Now you can use the tool in the following way:

String script = 'List acList = [Select Id, Name From Account Where Id IN :ID_LIST];' 
    +'for(Account acc : acList){'
    +'   acc.BillingCity = \'Gnite City\';'
    +'}'
    +'update acList;';

String query = 'Select Id From Account Where BillingCity != \'Gnite City\'';

Boolean sendEmailOnFinish = true;

ExecuteAnonymousBatch batch = new ExecuteAnonymousBatch(query, script, sendEmailOnFinish);
Database.executeBatch(batch, 200);

Where:
  • query: is the Batch's query
  • script: is the script you want to execute per batch execution
  • sendEmailOnFinish: send or not an email to the executing user in the finish method

The only thing you have to take care is to write a script that is compilable and that uses the ID_LIST variable that is injected in your script and that is of type List<ID> and that contains the IDs of all objects in the execution scope.

You can launch the script right from your tab with the Quick Console of the ORGanizer:


Results


At the end you'll receive a marvellous email with query, script and elaboration erros (if any):

Subject: 
 [Execute Anonymous Batch] Elaboration completed: with 3 errors.
 
Body:
 Query:
         Select Id From Account limit 40
 Execute anonymous code:
         List<Account> acList = [Select Id, Name From Account Where Id IN :ID_LIST];
         for(Account acc : acList){   acc.BillingCity = 'Gnite City';} 
         update acList;
 Errors:
         '00124000005FoHPAA0': System.DmlException: Update failed. First exception on row 0 with id 00124000005FoHPAA0; first error: FIELD_CUSTOM_VALIDATION_EXCEPTION, Account cannot be updated: [] -- AnonymousBlock: line 2, column 1
         '0012400000ZBRAGAA5': System.DmlException: Update failed. First exception on row 0 with id 0012400000ZBRAGAA5; first error: FIELD_CUSTOM_VALIDATION_EXCEPTION, Account cannot be updated: [] -- AnonymousBlock: line 2, column 1
         '0012400000ZBRJNAA5': System.DmlException: Update failed. First exception on row 0 with id 0012400000ZBRJNAA5; first error: FIELD_CUSTOM_VALIDATION_EXCEPTION, Account cannot be updated: [] -- AnonymousBlock: line 2, column 1


 Sent by: my@username.com

Behind the scenes


There is not trick behind this tool, it's just putting knowledge over knowledge.

The only thing worth to note is that I've used the Execute Anonymous action from the Metadata API. Why not the REST API?

Only because the SOAP version give you the debug log in response if you add the proper headers, while the REST API version needs you to query the log.

To ease script writing you can put your scripts in a File, Document or Static resource, load it by hand and pass it to your script execution.

Document scriptDoc = [Select Body From Document Where Name = 'My_Cleanse_Script'];

String query = 'Select Id From Account';

Boolean sendEmailOnFinish = true;

ExecuteAnonymousBatch batch = new ExecuteAnonymousBatch(query, scriptDoc.Body.toString(), sendEmailOnFinish);
Database.executeBatch(batch, 200);

That's it!


Tuesday, July 11, 2017

[Salesforce / Einstein] Playing around with apples and Einstein Prediction APIs

The machines are not going to rule humanity...for now.

So don't be afraid of AI in your daily job as Awesome Developer / Admin / Adminloper.

A new revolution has come in the CRM world and Salesforce leads it as usual.

Einstein is AI brought to our beloved CRM platform, in may ways: enriches your sales decisions, marketing strategies, smartifies your communities and your social behavior.

I know what you are thinking, how can a humble Salesforce developer empower Artificial Intelligence?

Again, afraid be not!

Salesforce conveys a set of APIs for image recognition or text analysis, so you can integrate the power of AI into your application, whether inside Salesforce or not.

What can you do with Einstein APIs?

At the time of writing, you can:

  • Classify images
  • Detect number, size and position of objects inside images
  • Classify sentiment in text
  • Categorize unstructured text into user-defined labels

Read the complete documentation at metamind.readme.io.

In this post I'll cover an example of how to classify images using Einstein Vision.

Use Case


Can you guess a business use case for this API?

A particulas piece of my fridge just broke down and it is difficult to explain by words which part should be replaced.

Just take a picture of the part and submit to the Einstein Vision engine (properly trained): the backoffice user may now be able to tell the "replacemente department" which part should be sent to the customer.

Another example, my hoven is not working and I don't remember the model: take a pic, send to Einstein engine, the system can guess the model and execute the proper actions.

In our example we'll just try to classify apples, not a cool business use case but it effectively shows how the library works.

First configurations


First thing to do is registering for the free Einstein Vision tier.

Go to https://api.einstein.ai/signup, register with your Developer ORG edition (use the Salesforce flow) and then download and save the provided key in the einstein_platform.pem file.

Go to your ORG and create a new Static Resource for this certificate and call it Einstein_Platform: this will be used to generate a JWT OAuth token every time it is needed.

Now create a new Remote Site Setting adding the https://api.metamind.io endpoint (this is the Einstein Vision API endpoint).

Now you are ready to use the provided package.

Before starting you should install the following Apex packages into your ORG (they are open source Einstein Vision wrappers):


Download and install into your ORG the following code from REPO: it's just 2 pages and 2 classes.

Before starting be sure to change your Einstein APi email address in the EinsteinVisionDemoController:

public static String getAccessToken(){
    String keyContents = [Select Body From StaticResource Where Name = 'Einstein_Platform' limit 1].Body.toString();
    keyContents = keyContents.replace('-----BEGIN RSA PRIVATE KEY-----', '');
    keyContents = keyContents.replace('-----END RSA PRIVATE KEY-----', '');
    keyContents = keyContents.replace('\n', '');

    // Get a new token
    JWT jwt = new JWT('RS256');
    jwt.pkcs8 = keyContents;
    jwt.iss = 'developer.force.com';
    jwt.sub = 'your@email.here';
    jwt.aud = 'https://api.metamind.io/v1/oauth2/token';
    jwt.exp = '3600';
    String access_token = JWTBearerFlow.getAccessToken('https://api.metamind.io/v1/oauth2/token', jwt);
    return access_token;    
}

Configure the Dataset


This repo has a configuration page (for model training) and a prediction page (see a live demo here ).

Let's open the administration page named EinsteinVisionDemoAdmin.

In the Dataset URL input copy the following dataset URL: https://raw.githubusercontent.com/enreeco/sf-einstein-vision-prediction-demo/master/dataset/mele.zip.

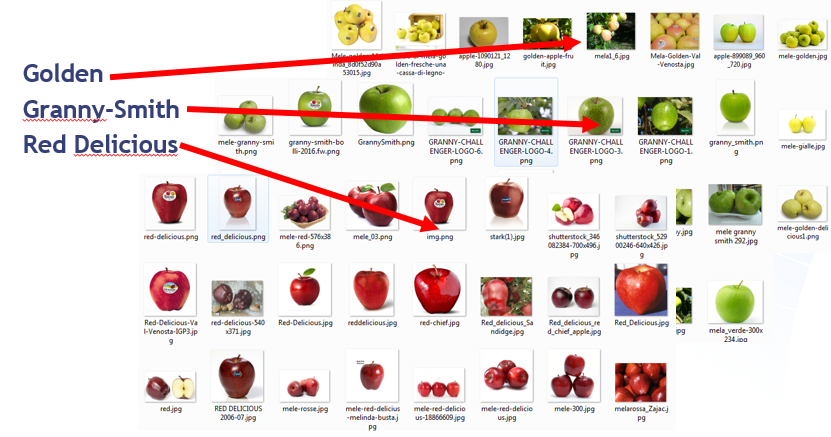
This ZIP file contains 6 folders: each folder represent a kind of apple (the folder name is the corresponding name) and it contains a list of 40/50 images of that kind of apple (I'm not an expert of apples, so some pictures may not be correct!).


Now press the Create Model Async button: there are 2 kinds of API for this porporuse, one is sync (and accepts zip files of up to 5 MB) and the other one is async (and accepts size of more than 5 MB).

This means that in this example we'll be using only the async API: the request is taken in charge:

DATASET:

{
  "updatedAt" : "2017-07-11T14:17:33.000Z",
  "totalLabels" : null,
  "totalExamples" : 0,
  "statusMsg" : "UPLOADING",
  "name" : "mele",
  "labelSummary" : {
    "labels" : [ ]
  },
  "id" : 1006545,
  "createdAt" : "2017-07-11T14:17:33.000Z",
  "available" : false
}

Now you can press the button labelled Get All Datasets and Models to watch the upload operation complete:

Datasets: 1

{
  "updatedAt" : "2017-07-11T14:17:37.000Z",
  "totalLabels" : 6,
  "totalExamples" : 266,
  "statusMsg" : "SUCCEEDED",
  "name" : "mele",
  "labelSummary" : {
    "labels" : [ {
      "numExamples" : 38,
      "name" : "red_delicious",
      "id" : 52011,
      "datasetId" : 1006545
    }, {
      "numExamples" : 44,
      "name" : "granny_smith",
      "id" : 52012,
      "datasetId" : 1006545
    }, {
      "numExamples" : 45,
      "name" : "royal_gala",
      "id" : 52013,
      "datasetId" : 1006545
    }, {
      "numExamples" : 42,
      "name" : "golden",
      "id" : 52014,
      "datasetId" : 1006545
    }, {
      "numExamples" : 53,
      "name" : "renetta",
      "id" : 52015,
      "datasetId" : 1006545
    }, {
      "numExamples" : 44,
      "name" : "fuji",
      "id" : 52016,
      "datasetId" : 1006545
    } ]
  },
  "id" : 1006545,
  "createdAt" : "2017-07-11T14:17:33.000Z",
  "available" : true
}

Now we can train our model by copying the dataset id into the Dataset ID input box and pressing the Train Model button: Einstein analyzes the images with its deep learning algorithm to allow prediction.

MODEL:

{
  "updatedAt" : "2017-07-11T14:21:05.000Z",
  "trainStats" : null,
  "trainParams" : null,
  "status" : "QUEUED",
  "queuePosition" : 1,
  "progress" : 0.0,
  "name" : "My Model 2017-07-11 00:00:00",
  "modelType" : "image",
  "modelId" : "UOHHRLYEH2NGBPRAS64JQLPCNI",
  "learningRate" : 0.01,
  "failureMsg" : null,
  "epochs" : 3,
  "datasetVersionId" : 0,
  "datasetId" : 1006545,
  "createdAt" : "2017-07-11T14:21:05.000Z"
}

The process is asynchronous and takes some time to complete (it depends on the parameters passed to the train API, see code).

Press the Get All Datasets and Models button to see the process ending:

Datasets: 1

{
  "updatedAt" : "2017-07-11T14:17:37.000Z",
  "totalLabels" : 6,
  "totalExamples" : 266,
  "statusMsg" : "SUCCEEDED",
  "name" : "mele",
  "labelSummary" : {
    "labels" : [ {
      "numExamples" : 38,
      "name" : "red_delicious",
      "id" : 52011,
      "datasetId" : 1006545
    }, {
      "numExamples" : 44,
      "name" : "granny_smith",
      "id" : 52012,
      "datasetId" : 1006545
    }, {
      "numExamples" : 45,
      "name" : "royal_gala",
      "id" : 52013,
      "datasetId" : 1006545
    }, {
      "numExamples" : 42,
      "name" : "golden",
      "id" : 52014,
      "datasetId" : 1006545
    }, {
      "numExamples" : 53,
      "name" : "renetta",
      "id" : 52015,
      "datasetId" : 1006545
    }, {
      "numExamples" : 44,
      "name" : "fuji",
      "id" : 52016,
      "datasetId" : 1006545
    } ]
  },
  "id" : 1006545,
  "createdAt" : "2017-07-11T14:17:33.000Z",
  "available" : true
}

{
  "updatedAt" : "2017-07-11T14:22:33.000Z",
  "trainStats" : null,
  "trainParams" : null,
  "status" : "SUCCEEDED",
  "queuePosition" : null,
  "progress" : 1.0,
  "name" : "My Model 2017-07-11 00:00:00",
  "modelType" : "image",
  "modelId" : "UOHHRLYEH2NGBPRAS64JQLPCNI",
  "learningRate" : null,
  "failureMsg" : null,
  "epochs" : null,
  "datasetVersionId" : 3796,
  "datasetId" : 1006545,
  "createdAt" : "2017-07-11T14:21:05.000Z"
}

We are almost ready!
Predict!


The only thing you have to do is to open the EinsteinVisionDemo demo passing the above Model Id (e.g. /apex/EinsteinVisionDemo?model=UOHHRLYEH2NGBPRAS64JQLPCNI):


The data set used is not the best dataset out there, it's been created with the help of Google and a little of common sense, also the number of images for folder is only 40/50, this means the algorithm does not have enough data to get the job done...but actually it does its job!

"May the Force.com be with you!" [cit. Yodeinstein]

Thursday, June 16, 2016

[Salesforce] The Sobject Crusade: ApexTrigger

Source: ApexTrigger

The ApexClass is the most beloved object for Salesforce Developers.

It identifies a specific Apex Class, so you can query for Classes runtime.

Note that, even if the describe states that the ApexTrigger is creatable and updatable, an exception is thrown if you try to insert/update via API a trigger: use the tooling API or metadata API instead.

Among the fields, you can query for the Body of the trigger, whether it is valid or not, size in byte without comments.

Here an example:

Select Id, Name, ApiVersion, Body, IsValid, LengthWithoutComments, TableEnumOrId, UsageAfterDelete, UsageAfterInsert From ApexTrigger ORDER BY Name

Saturday, May 28, 2016

[Salesforce] The Sobject Crusade: ApexTestResult

Source: ApexTestResult

After you execute a test class (ApexTestQueueItem), you'll get the test results of a given test method execution.

To query this information use the ApexTestResult object.

The object conveys the following fields:

  • ApexClassId: the test class
  • ApexLogId: the ApexLog object (if log is enabled)
  • AsyncApexJobId: the main aync job (this is the same as ApexTestQueueItem.ParentJobId) to which the given test execution belongs
  • Message: the exception message, only if an exception occurs
  • MethodName: the test method name of the given log
  • Outcome: the result of the test method execution (Fail, Pass, CompileFail)
  • QueueItemId: lookup to the ApexTestQueueItem the result belogs to
  • StackTrace: exception stack trace (if any)
  • TestTimestamp: test execution date/time

To launch a test, see the instructions on the ApexTestQueueItem object page.

Now you can query for the results:

Select Id, ApexClass.Name, MethodName, ApexLogId, Outcome, TestTimestamp, AsyncApexJobId, QueueItemId From ApexTestResult order by TestTimestamp DESC


Given this failing test class:

@isTest
private class ExceptionTestClass {
    
    private static testmethod void failMethod(){
     update new Case(Subject = 'Test');
    }
}

The execution will lead to a test error:

[Salesforce] The Sobject Crusade: ApexTestSuite

Source: ApexTestSuite

String '16 comes with a handy feature regarding test execution, the Test Suites.

They are a collection of tests ment to be run together organized in a single suite.

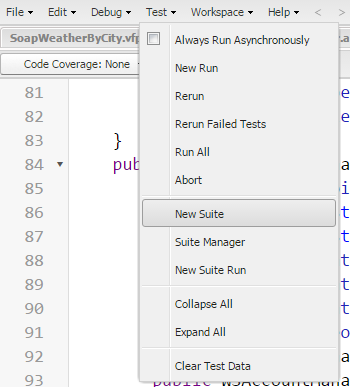
To access the test suite open your Developer Console and click Test > New Suite and enter the Suite name:


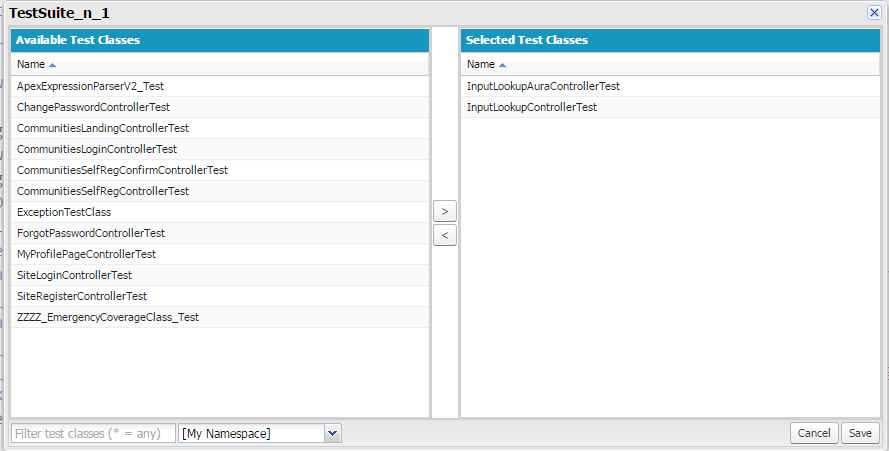
Then select all test classes you want to run in the suite:


In the Test > Suite Manager menu item you can change a suite's configuration, while in Test > New Suite Run you can choose which suites to execute.


The Settings button allows to set the maximum number of failuers allowd, so the test suite ends its run immediately after a given number of exceptions are thrown.

Clicking Run the tests are executed and presented on the Tests tab on the lower side of the Developer console:


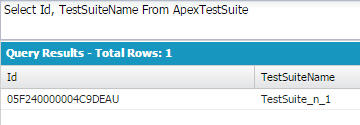
You can query the Object easily.

Select Id, TestSuiteName From ApexTestSuite


To check for the classes involved in the suite you need to query the TestSuiteMembership that links Apex classes to the Suite, but it is another story.

[Salesforce] The Sobject Crusade: ApexTestQueueItem

Source: ApexTestQueueItem

The ApexTestQueueItem object gives you access to the underlying test item for a given test job for a given class.

If you don't know what is a test class refer to this article to get started: a test class is a class used to (guess what?) test a set of apex classes / triggers in order to verify and certify the features of your implementation.

Every ORG must have at least 75% of code coverage (here for more details), that is your test classes should cover at least 75% of the lines you have written in your Apex classes.

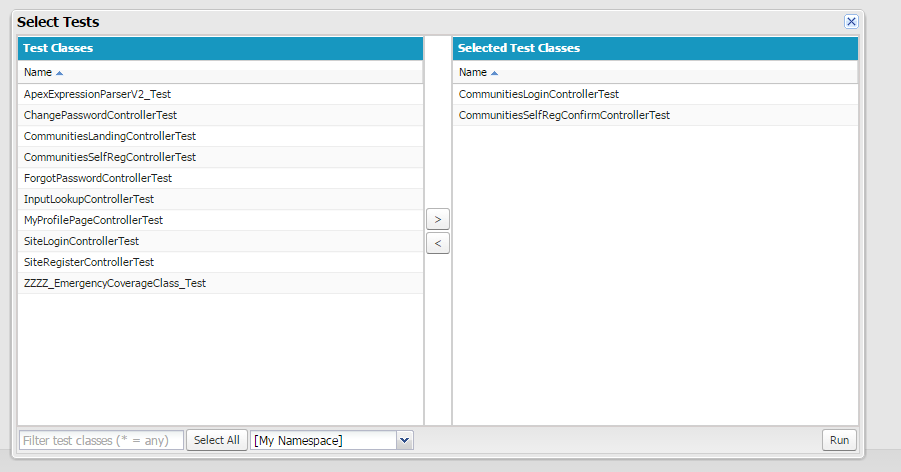
To execute a test class (or a set of test classes), go to Your Name > Developer Console, click on Test menù, select New Run and then select the test classes you want to execute:


On the lower part of the console you can see the test executing:


You can now query all the single job items (the second level of the tree):

select id, ApexClass.Name, ExtendedStatus, ParentJobId, Status, CreatedDate from ApexTestQueueItem order by CreatedDate desc


You can update a ApexTestQueueItem to change its status if you want to abort the job (setting Status to Aborted), or you can insert a new ApexTestQueueItem object: this will create a new Process Job, e.g.:

ApexTestQueueItem item = new apextestqueueitem();
item.ApexClassId = [select id from apexclass where name = 'CommunitiesLandingControllerTest'].Id;
insert item;

Monday, May 9, 2016

[Salesforce] The Sobject Crusade: ApexClass

Source: ApexClass

The ApexClass is the most beloved object for Salesforce Developers.

It identifies a specific Apex Class, so you can query for Classes runtime.

Note that, even if the describe states that the ApexClass is creatable and updatable, an exception is thrown if you try to insert/update via API a class: use the tooling API or metadata API instead.

Among the fields, you can query for the Body of the class, whether it is valid or not, size in byte without comments.

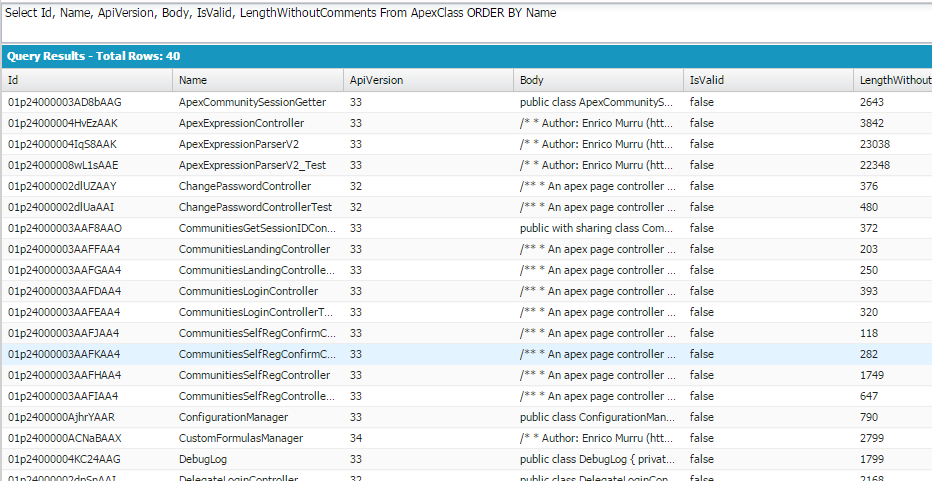
Here an example:

Select Id, Name, ApiVersion, Body, IsValid, LengthWithoutComments From ApexClass ORDER BY Name

Wednesday, May 4, 2016

[Salesforce / Lightning Connect] Lightning Connect Custom Adapters and MongoDB (DML support) pt.2

Do you remember the Lightning Connect Custom Adapters and MongoDB post?

Things have changed after that post and finally the platform supports all DML statements: insert, update and delete!

To make the magic work I had to make:

Follow the post instructions to setup up your Heroku app.

The core changes are the support for the methods.

Open the MongoDBDataSrouceProvider.cls class:

override global List getCapabilities() {
 List capabilities = new List();
 capabilities.add(DataSource.Capability.ROW_QUERY);
 capabilities.add(DataSource.Capability.SEARCH);
 //new capabilities added
 capabilities.add(DataSource.Capability.ROW_CREATE);
 capabilities.add(DataSource.Capability.ROW_UPDATE);
 capabilities.add(DataSource.Capability.ROW_DELETE);

 return capabilities;
}

The provider has been added with more capabilities, CREATE, UPDATE and DELETE.

Let's open the MongoDBDataSourceConnectio.cls class and look at the 2 new methods:

global override List<DataSource.UpsertResult> upsertRows(DataSource.UpsertContext context) {
    List<DataSource.UpsertResult> results = new List<DataSource.UpsertResult>();
    List<Map<String, Object>> rows = context.rows;
    Http h = new Http();
    
    for(Integer i = 0; i < rows.size(); i++){
        Map<String,Object> row = rows[i];
        HttpRequest request = new HttpRequest();
        request.setHeader('Content-Type','application/json');
        request.setTimeout(60000);
        Map<String,Object> invoice = new Map<String,Object>();
        if(String.isBlank((String)row.get('ExternalId'))){
            request.setMethod('POST');
            request.setEndpoint(DB_ENDPOINT_NC);
        }else{
            request.setMethod('PUT');
            request.setEndpoint(DB_ENDPOINT_NC+'/'+row.get('ExternalId'));
        }
        
        invoice.put('accountid', row.get('Account'));
        invoice.put('contractid', row.get('Contract'));
        invoice.put('created', row.get('CreatedDate'));
        invoice.put('amount', row.get('Amount'));
        invoice.put('description', row.get('Description'));
        
        request.setBody(JSON.serialize(invoice));
        
        HttpResponse response = h.send(request);
        
        List<Object> mList = (List<Object>)JSON.deserializeUntyped(response.getBody());
        Map<String, Object> m = (Map<String, Object>)mList[0];
        if (response.getStatusCode() == 200){
            String objId = String.valueOf(m.get('_id'));
            if(String.isBlank(objId)){
                objId = String.valueOf(row.get('ExternalId'));
            }
            results.add(DataSource.UpsertResult.success(objId));
        } 
        else {
            results.add(DataSource.UpsertResult.failure(
                String.valueOf(row.get('ExternalId')), 'The callout resulted in an error: ' + response.getStatusCode()+' - '+response.getBody()));
        }
    }
    return results;
}

global override List<DataSource.DeleteResult> deleteRows(DataSource.DeleteContext context) {
    List<DataSource.DeleteResult> results = new List<DataSource.DeleteResult>();
    Http h = new Http();
    
    for (String externalId : context.externalIds){
        HttpRequest request = new HttpRequest();
        request.setHeader('Content-Type','application/json');
        request.setTimeout(60000);

        request.setMethod('DELETE');
        request.setEndpoint(DB_ENDPOINT_NC+'/'+externalId);
        
        HttpResponse response = h.send(request);
        if (response.getStatusCode() == 200
            || response.getStatusCode() == 201){
            results.add(DataSource.DeleteResult.success(String.valueOf(externalId)));
        } 
        else {
            results.add(DataSource.DeleteResult.failure(
                String.valueOf(externalId), 'The callout resulted in an error: ' + response.getStatusCode()+' - '+response.getBody()));
        }
    }
   return results;
}


WARNING: this code is not optimized for bulk upsert/delete because it makes a callout for every record.


It's a proove of concept, so I challenge you to bulkify the class!

How can you insert an external object provided by a Lightning Connect adapter?

The Database class has been provided with new methods:

  • deleteAsync
  • insertAsync
  • updateAsync

These methods are used to make the calls to the remote system and actually do the work!

Database.insertAsync(new List<MongoDB_Invoice__x>{
    new MongoDB_Invoice__x(Amount__c=1, Description__c ='Async Test 1'),
    new MongoDB_Invoice__x(Amount__c=2, Description__c ='Async Test 2')
});
Database.deleteAsync([Select Id From MongoDB_Invoice__x Where Description__c = 'Async Test 1']);

Every method has an alternative method that provides a callback class, which allows to make further actions after the records are upserted/deleted.

For instance, the asyncUpdate has an optional second parameter of type Database.AsyncSaveCallback that can be created to execute some logic after a specific record is done (the class is called every time a record is updated).

Every asyncDML method returns a List of Database.DeleteResult or Database.SaveResult that contains a link to the asynchrounous operation that can be retrieved by calling the Database.getAsyncLocator(result) method and passing the value to the Database.getAsyncSaveResult(asyncLocator) or Database.getAsyncDeleteResult(asyncLocator): this way you can get the status of the asynchronous operation.

Thursday, March 3, 2016

[Salesforce / Apex] Let's play with Named Credentials and OAuth 2.0

Few days ago I was lurking in the Named Credentials configurations.

What are named credentials?

Here are the official docs.

They are essentially a way to store callout configurations such as:

  • Endpoint (only HTTPs endpoints are supported)
  • Callout certificate (if needed, from the local key store)
  • Authentication protocol (if needed)
  • Authentication settings

With named credentials you don't need Remote Site Setting configuration anymore: add you credential and the job is done!

The Endpoint stores the callout URL but it could also store a part of the endpoint (e.g. only the domain or a specific piece of path, such as https://na1.salesforce.com/services/Soap/class/).

The Callout certificate grabs a certificate from the Certificate and Key Management setup page, allowing a more secure connection between hosts.

I'm going to focus on the Authentication protocol.


You can choose among the following values:
  • No Authentication
  • Password authentication
  • OAuth 2.0

And you can set the authentication globally (Identity type = Named principal) or per user (Identity Type = Per User): if you don't need any authentication, just use the value "Identity Type = Anonymous"

The password authentication is pretty straightforward: it uses BASIC authentication (username/password BASE64 encoded sent in the request headers).

But what about OAuth2?


I wanted to test this option using all but the Salesforce platform: there are plenty of services that expose the OAuth 2.0 authentication, but I love Salesforce and that's how I want to test things!

You need 2 orgs:
  • Remote ORG: this will be the provider of your OAuth 2.0 authentication, it hosts the remote service you want to access (and that you can only access with this ORG's user)
  • Local ORG: this is the ORG where you want to invoke the remote service and where you are configuring the Named Credentials

Setup the Remote ORG


First let's setup the remote service.

Create a new SOAP webservice:

global class EchoManager {
    webservice static String echo(String text){
        return 'ECHO FROM ORG '+UserInfo.getOrganizationId()+': '+text;
    } 
}

This service echoes the request text's returning also the remote ORG ID.

Useful uh?

Go to Setup > Develop > Apex Classes search the EchoManager class and click the WSDL link next to the class name: this way you can download the WSDL file you are going to import in the Local ORG to call the service.

Make sure the remote user you'll be using (with OAuth2) to consume the service from the Local ORG is enabled to access the Apex Class (from its Profile or assigning a Permission set: if this is an Administrator profile no need to check!).

Last step on this org is to setup a Connected App: this confgiuration will give access to the ORG from outside on behalf of an external application.

Go to Setup > Create > Apps, scroll to the Connected Apps section and click the New button:


Setup a name, a contact Email, a logo image (I choose Master Yoda).

Flag Enable OAuth Setting and set Callback URL to a fake value (e.g. callback://myapp): we'll be configuring this field later (this hosts the callback url of the Local ORG).

Finally set the full and refresh_token scopes (the last one is necessary to allow for sending refresh token).

Onve you save it can take 5/10 minutes for the changes to be propagated.

This is pretty much what you see now (except for the Callback URL):


Let's go back to the Local ORG.

Setup the Local ORG


First let's import the remote service WSDL from Setup > Develop > Apex Classes and click the Generate From WSDL button.

Select the WSDL file just saved from the Remote ORG, use a namespace name (WSEchoManager in my case) and Salesforce will create the Apex Stub.

Let's create a Visualforce page with a controller to test it:

public class EchoController {
    public String requestText{get;set;}
    public String responseText{get;set;}
    public void sendRequest(){
        this.responseText = null;
        try{
            WSEchoManager.EchoManager stub = new WSEchoManager.EchoManager();
            this.responseText = stub.echo(this.requestText);
        }catch(Exception e){
            this.responseText = 'Unexpected exception :'+e.getMessage();
        }
    }
}

<apex:page controller="EchoController" tabStyle="Account">
    <apex:sectionHeader title="Remote echoes" />
    <apex:form>
        <apex:pageBlock>
            <apex:pageBlockSection columns="2">
                <apex:pageBlockSectionItem>
                    <apex:outputLabel>Say something:</apex:outputLabel>
                    <apex:inputText value="{!requestText}" />
                </apex:pageBlockSectionItem>
                <apex:commandButton value="Send request" action="{!sendRequest}" />
            </apex:pageBlockSection>
            <apex:pageBlockSection columns="1" 
                                   title="Server response" 
                                   rendered="{!NOT(ISBLANK(responseText))}">
                <apex:outputText value="{!responseText}" />
            </apex:pageBlockSection>
        </apex:pageBlock>
    </apex:form>
</apex:page>

Let's try it:


As expected we haven't still enabled anything.

Jump to Setup > Security Controls > Auth. Providers and click the New button and choose the Salesforce provider type:


This is the authentication provider will be using to initiate the OAuth 2 dance with the Remote ORG.

In the Consumer Key and Consumer Secret fields set the values from the Remote ORG connected app (called Consumer Key and Secret as well).

The Authorization Endpoint URL and Token Endpoint URL are setup with the https://login.salesforce.com/services/oauth/... values, but in this case I've used the Remote ORG custom domain (you can leave with the default values).

In the Default Scopes set the selected scopes in the Remote ORG connected app separated by a blank space (full refresh_token).

Now click "Save" and get the Callback URL you get in the Salesforce Configuration section:


Go back to the Remote ORG connected app and set the Callback URL with the one just copied.

We are about there, don't worry!


Go back to your Local ORG and go to Setup > Security Controls > Named Credentials and click New.


Give a fantastic name to your named credential (you'll be using it in your stub class), set the URL with the service url you find in the WSEchoManager class:

 . . .
    public class EchoManager {
        public String endpoint_x = 'https://eu6.salesforce.com/services/Soap/class/EchoManager';
        public Map<String,String> inputHttpHeaders_x;
    . . .

Set the Named Principal Identity Type and the OAuth 2.0 protocol; select the Authentication Provider just configured and flag the Start Authentication Flow on Save: this way, upon saving the named credential, you are requested to access to the remote provider.

Flag Allow Merge Fields in HTTP Body as well in order to put the OAuth token inside the request in a "non standard" way (we dont' want to use the Authorication: Bearer XXX header).


Cheers: you have a working connection!


Finally we have to change the stub code to recall the named credential:

 . . .
    public class EchoManager {
        public String endpoint_x = 'callout:Echo_Service';
        . . .
        public String echo(String text) {
            WSEchoManager.echo_element request_x = new WSEchoManager.echo_element();
            request_x.text = text;
            this.SessionHeader = new SessionHeader_element();
            this.SessionHeader.sessionId = '{!$Credential.OAuthToken}';
        . . .

We are using the Echo_Service named credential in the endpoint_x member and adding the SessionHeader parameters in the SOAP request using the named credential merge field {!$Credential.OAuthToken}, which stores the token needed to authorize the call.

Thanks to the Allow Merge Fields in HTTP Body the engine replaces automagically this string with the session ID referenced by the merge field inside the SOAP request...and:


You can find the full code in the following Github repository.

Wednesday, October 7, 2015

[Salesforce / Custom Settings] How and Why

This is a beginner's guide to Custom Settings, that shows a practical way of using all the features they convey.

For TL;DR people, this is the GitHub repository of the example.

One of the greatest pros of the Force.com platform is the extraordinary quick development phase: even when you are under continous software development, you can change your processes implementation within minutes.

With great features come great responsibilities, that’s why you should give administrators, who may not be developers, the same power to configure the code flow.

Before the introduction of custom settings, the only options were:

  • Hard coding constants on your classes
    • Pros: Simple to handle for developers
    • Cons: You need a deploy every time you need to change a value

  • Creating custom objects where storing your configuration (even if only 1 set of data)
    • Pros: High flessibility
    • Cons: You need to do a query every time you need a configuration value (this could be painfull in large and complex implementations)

The introduction of Custom settings made developer lifes easier.

A Custom Setting is an SObject that is available in every execution context (i.e. within apex classes, triggers, visualforce pages, formulas, workflows, ...) without the need of query, so basically you always have an instance of an object with all its fields ready to be used.

Let's do it


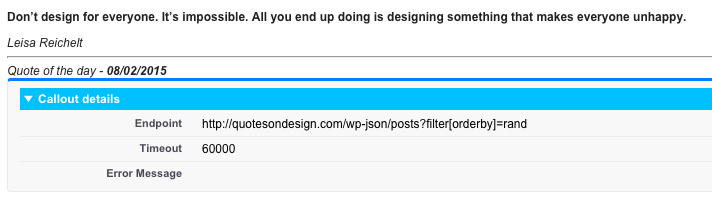
Let's start with a simple Visual Force page that shows, calling a public API, a random quote, *QuoteOfTheDay.page*:

<apex:page controller="QuoteOfTheDayController" action="{!onLoad}" tabStyle="Idea">
    
    <b><apex:outputText value="{!qod}" escape="false" /></b>
     
    <i>{!author}</i>
    
    <hr />
    
    <i>Quote of the day - <b>{!dt}</b></i>
    
    <br/> 
    
    <apex:pageBlock rendered="{!DEBUG_MODE}">
        <apex:pageBlockSection  title="Callout details" columns="1">
        
            <apex:pageBlockSectionItem>
                <apex:outputLabel value="Endpoint" />
                <apex:outputPanel>{!CALLOUT_ENDPOINT}</apex:outputPanel>
            </apex:pageBlockSectionItem>
            
            <apex:pageBlockSectionItem>
                <apex:outputLabel value="Timeout" />
                <apex:outputPanel>{!CALLOUT_TIMEOUT}</apex:outputPanel>
            </apex:pageBlockSectionItem>
            
            <apex:pageBlockSectionItem>
                <apex:outputLabel value="Error Message" />
                <apex:outputPanel>{!errorMessage}</apex:outputPanel>
            </apex:pageBlockSectionItem>
            
        </apex:pageBlockSection>
        
    </apex:pageBlock>
    
</apex:page>

public with sharing class QuoteOfTheDayController {
    
    public String CALLOUT_ENDPOINT{
        get{
            return ConfigurationManager.CALLOUT_ENDPOINT;
        }
    }
    
    public Integer CALLOUT_TIMEOUT{
        get{
            return ConfigurationManager.CALLOUT_TIMEOUT;
        }
    }
    
    public Boolean DEBUG_MODE{
        get{
            return ConfigurationManager.DEBUG_MODE;
        }
    }
    
    public String DATE_FORMAT{
        get{
            return ConfigurationManager.getDateFormat(UserInfo.getLocale());
        }
    }
    
    //quote of the day
    public String qod{get;Set;}
    //quote of the day author
    public String author{get;Set;}
    //date of request
    public String dt{get;set;}
    //debug message
    public String errorMessage{get;Set;}
    
    //loads the Quote of the Day on load
    public void onLoad(){
        
        //date of callout
        DateTime dateOfCall = System.now();
        
        try{
            Http h = new Http();
            HttpRequest request = new HttpRequest();
            request.setEndpoint(CALLOUT_ENDPOINT);
            request.setTimeout(CALLOUT_TIMEOUT);
            request.setMethod('GET');
            HttpResponse response = h.send(request);
            List<String> result = getQuoteFromResponse(response);
            this.qod = result[0];
            this.author = result[1];
        }catch(Exception e){
            this.qod = 'Something bad happened. Please reload';
            this.errorMessage = e.getMessage();
        }
        this.dt = dateOfCall.format(DATE_FORMAT);
    }
    
    /*
    Parse the "Quote Of The Day" API response (details @ http://quotesondesign.com/api-v4-0/)
    @return - List<String> contains 0 => quote, 1 => author 
    */
    public static List<String> getQuoteFromResponse(HttpResponse response){
        String resp = response.getBody();
        List<Object> jsonResponse = (List<Object>)JSON.deserializeUntyped(resp);
        Map<String,Object> quote = (Map<String,Object>)jsonResponse[0];
        String quoteString = (String)quote.get('content');
        String authorString = (String)quote.get('title');
        return new List<String>{quoteString, authorString};
    }
    
    public class CustomException extends Exception{}
}


On page load, the controller:

  1. Stores date/time of request
  2. Creates an HttpRequest setting its endpoint, timeout, method (GET)
  3. Sends the request and parses the response (getting the quote and the author)
  4. Formats the callout's date depending of current User's locale

The DEBUG_MODE allow to see some info about the current callout (for debug porpouses).

On the page controller we have no configuration, because they are written on the following utility class:

public class ConfigurationManager{
    
    //global endpoint
    public static String CALLOUT_ENDPOINT{
        get{
            return 'http://quotesondesign.com/wp-json/posts?filter[orderby]=rand';
        }
    }

    //global timeout in ms
    public static Integer CALLOUT_TIMEOUT{
        get{
            return 60000;
        }
    }

    //user/profile centric debug mode
    public static Boolean DEBUG_MODE{
        get{
            return false;
        }
    }

    //returns a specific date format given the locale code
    public static String getDateFormat(String localeCode){
        if(localeCode == 'it_IT'){
            return 'dd/MM/yyyy';
        }
        return 'MM/dd/yyyy';
    }

}

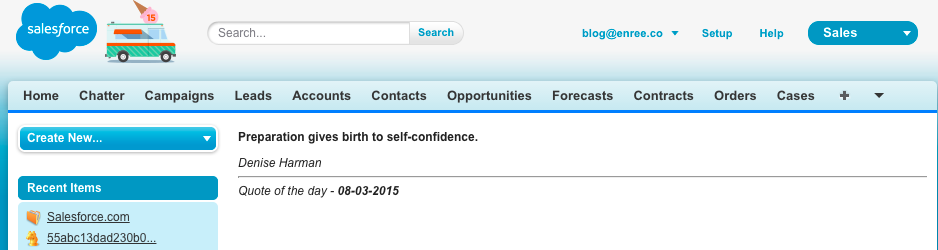
The result is:


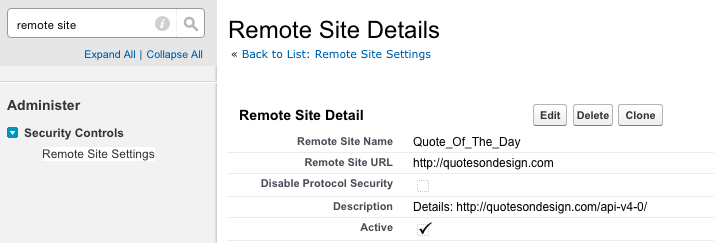
Before running the page remember to add the http://quotesondesign.com endpoint among the trusted endpoints for the ORG, by selecting Setup > Security Controls > Remote Siste Settings.


Now let's open the page:


You can change the hardcoded configurations on the ConfigurationManager class: let's set the DEBUG_MODE variable to true:


This example clearly shows that it is hard, for non developers, to alter the configurations.

Here come the Custom Settings: they are Custom Objects that can be used without making any SOQL and are fitted to current User's context.

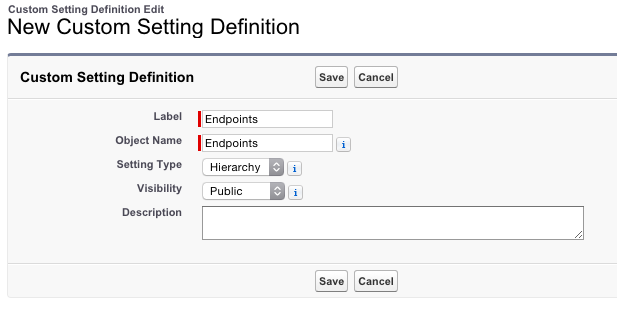
Let's create a new Custom Setting with Setup > Custom Settings > New:


The Hierarchic custom setting is a setting that has a global value for its fields which can be overridden on a per User / User's Profile basis.

This will be more clear later.

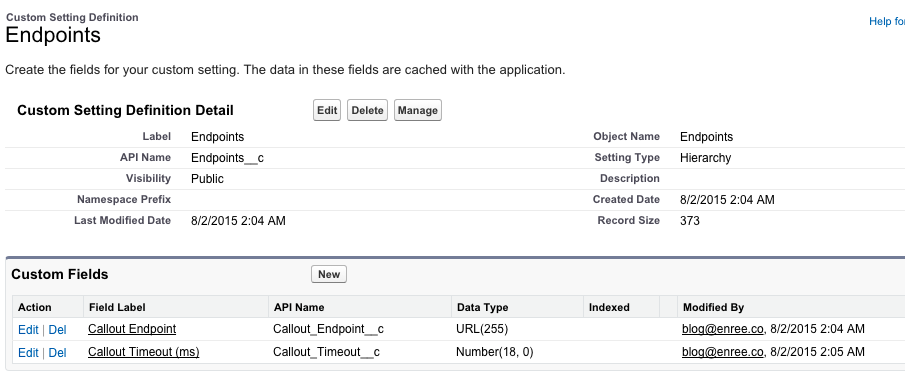
A Custom Setting is just like a Custom SObject, so you can add all fields you want (with some exceptions on the types):


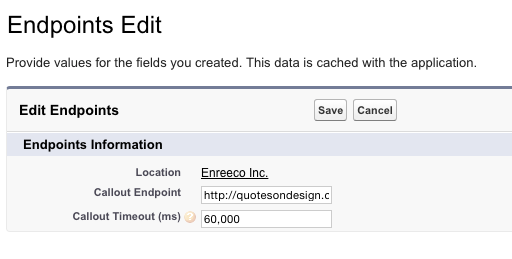
To set a value for the fields, click on the Manage button and then on the **Edit** button:


These are global values for the fields and they will be the only values we will be needing for this custom setting.

Set the same values we have on the ConfigurationManager class.

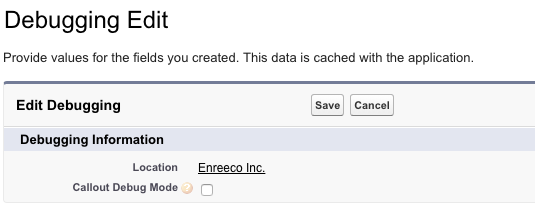
Let's create another Custom Setting for the DEBUG_MODE flag:


Let's set a global value with Manage > Edit:


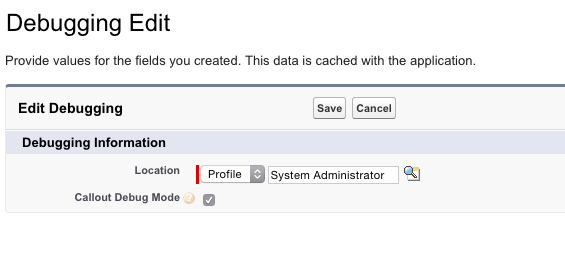
Then click the New button on the lower section of the "Manage" page and add new values for the "System Administrator" profile:


This means that the Debugging custom setting will have a global value and a value fitted for System Administrator users: every administrator that will execute the page will see the debug section.

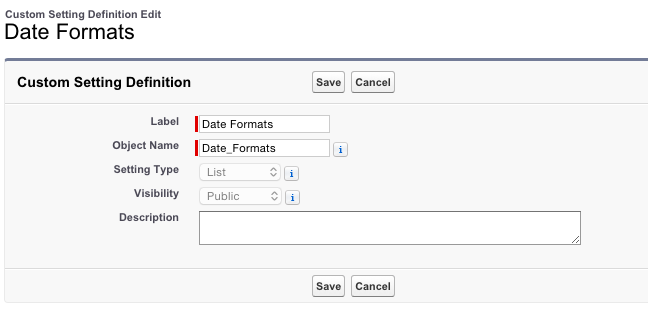
Finally let's add the last custom setting for the date formats, by choosing a List type:


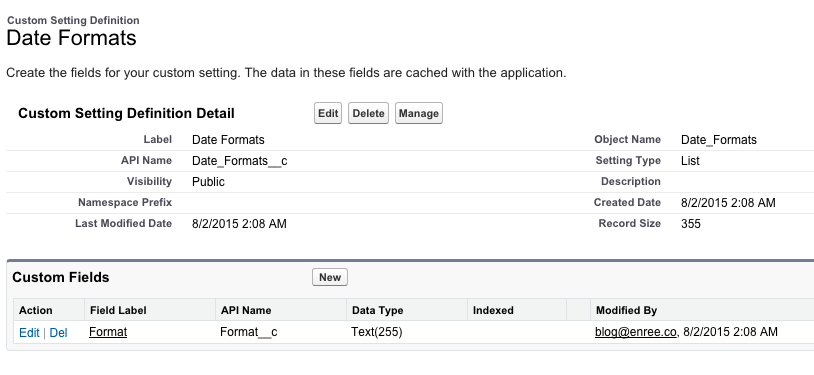
With the following fields:


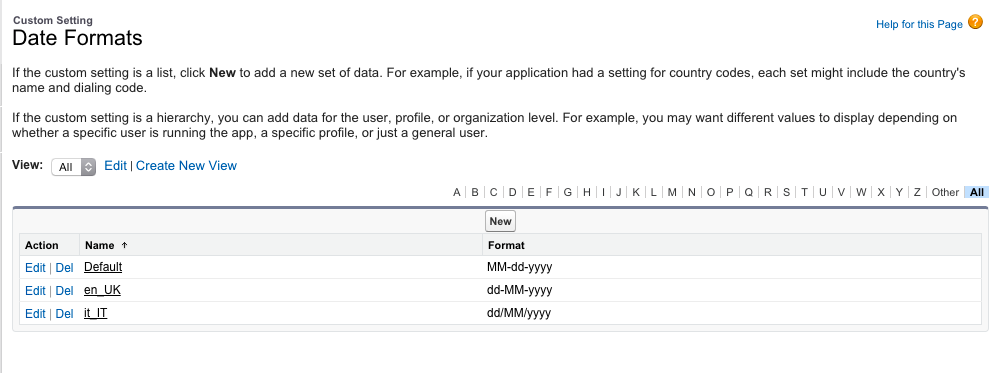
This time, when creating a new value, we will have a set of values (remember the List type) instead of global/user/profile values, each one identified by a Name field:


For each locale code you can set a specific date format plus a Default value (to be handled manually).

Now that we have create all the settings, we need to link them to the code, so let's change the *ConfigurationManager* class accordingly:

public class ConfigurationManager{
    
    //global endpoint
    public static String CALLOUT_ENDPOINT{
        get{
            return Endpoints__c.getOrgDefaults().Callout_Endpoint__c;
        }
    }

    //global timeout in ms
    public static Integer CALLOUT_TIMEOUT{
        get{
            return Endpoints__c.getOrgDefaults().Callout_Timeout__c.intValue();
        }
    }

    //user/profile centric debug mode
    public static Boolean DEBUG_MODE{
        get{
            return Debugging__c.getInstance().Callout_Debug_Mode__c;
        }
    }

    //returns a specific date format given the locale code
    public static String getDateFormat(String localeCode){
        Date_Formats__c defaultFormat = Date_Formats__c.getInstance('Default');
        Date_Formats__c localeFormat = Date_Formats__c.getInstance(localeCode);
        if(localeFormat != null) return localeFormat.Format__c;
        return defaultFormat.Format__c;
    }

}

From now on if you need to change the endpoint of the service, debug a specific user or change data format according to user locale, you will not need to change the code but you can train an administrator to do it by him self.

There is only some limitation:


In this brief article you have:

  • Created 2 different Hierarchic Custom Settings
  • Created a List Custom Setting
  • Managed all kind of values (global, profile, list)
  • Recalled their values from Apex controller
  • Been an **awesome** developer

Here are some useful resources:

  • GitHub repository of the article
  • Salesforce Docs: https://developer.salesforce.com/docs/atlas.en-us.apexcode.meta/apexcode/apex_customsettings.htm?search_text=custom%20settings
  • Custom settings methods: https://developer.salesforce.com/docs/atlas.en-us.apexcode.meta/apexcode/apex_methods_system_custom_settings.htm?search_text=custom%20settings
  • Custom settings limits: https://help.salesforce.com/apex/HTViewHelpDoc?id=cs_limits.htm&language=en_US
  • Live example: https://blog-enreeco-community-developer-edition.eu5.force.com/examples/QuoteOfTheDay

Thursday, August 13, 2015

[Salesforce / Apex Formula] Help me testing my Apex Formula Algorithm!


This is a call to arms!


In the past months I have developed an implementation in Apex of Salesforce Formulas in order to have a way to use a formula result dynamically without the need to have a custom field on an object.

It has been a huge work and a lot has still to be done, but I need your help to create a big testbook of formulas, in order to point out bugs, errors, and wathever is bad in this implementation.

This implementation supports (syntax guide here):
  • Base object fields (e.g. MyField__c == 4)
  • Lookup fields (e.g. Relation__r.Account.Name == 'ACME')
  • Constants (e.g. $PI, EE, $TODAY, $NOW, $RANDOM
  • Logical operators in function style or inline (e.g. AND(true,false) ; true && false)
  • IF and CASE flow expressions (e.g. IF(true,1,0) )
  • Various String functions (e.g. LEFT("String",2) )
  • Various Math functions (e.g. POW(2,5) )
  • Type conversion functions (e.g. DATE("2015-05-23") )
  • DateTime functions (e.g. DATETIME(2015,12,01,0,0,0) ; ADDYEARS($TODAY, 10) )
  • Multiline comments
  • Access to Hierarchy Custom Settings (e.g. $Setup.HierarchyCS__c.Value__c)
  • Access to Hierarchy Custom Settings (e.g. $Setup.ListCS__c["aName"].Value__c)

You can set different return types:
  • BOOLEAN
  • NUMBER
  • STRING
  • DATE
  • DATETIME

For the NUMBER return type you can also set a Scale attribute.

Once released the method call will be something like:

String formula = 'IF(NumberOfEmployees > 15, NumberOfEmployees, NumberOfEmployees/2)';
String objectId = '001000000123456789AAA';
String objectType = 'Account';
String returnType = 'NUMBER';
String scale = 2;
ApexFormulaResult formulaResult = ApexFormulaParser.evaluate(formula, objectId, objectType, returnType, scale);

Here is the Apex Formula Playroom I've built with Salesforce Site.


I've create a custom object, TestObject__c, which you can select to try the algorithm, which has all kind of Salesforce fields.

This is the raw interface of the playroom:


  1. List of all custom objects you can use (if you need more tell me!). Click on the name to select it.
  2. These are the details (with the objects field API names) of the selected object
  3. You can also test custom settings as well
  4. You can select a built-in formula or you can set a specific Output Type and Scale
  5. Formula's body and any suggestion you want to give me, and the formula result as well

Every formula you input and calculate is stored in the Site, so please avoid using personal informations that you don't want to share!


Feel free to break down my code, I expect a lot of work in error handling, but the awesome Developer Salesforce Community< is here to help, isn't it?

And remember: